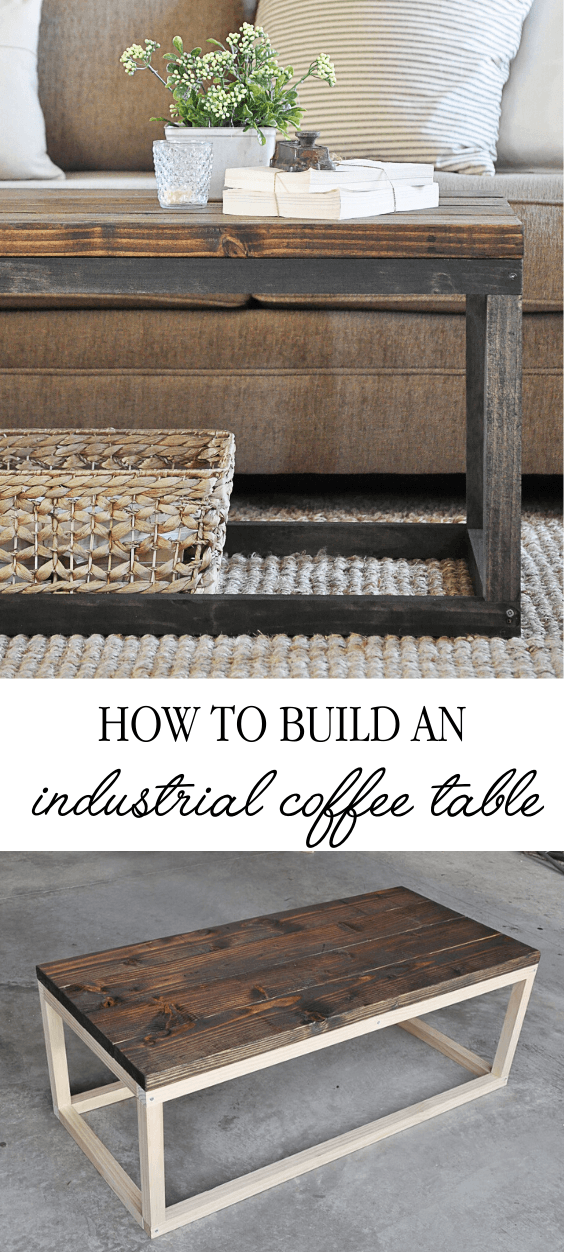
DIY Industrial Coffee Table
Build your own affordable DIY Industrial Coffee Table with this easy step by step tutorial. It’s the perfect living room addition for any decor style!
You know those projects that make you do a little happy dance when you finish them? This affordable DIY Industrial Coffee Table is one of those!
Not only do we have a much needed new piece of furniture now, but we saved a lot of money building it ourselves rather than buying it. The DIYer in me is so proud!
I’ve wanted one of these industrial wood top coffee tables for a while now. But the ones I liked were always a little out of my budget. So as any DIY enthusiast would do, I decided to attempt to make one myself for an affordable price.
I have seen some of my fellow blog friends make some great knockoff versions of this coffee table (such as this one by Home Made Lovely), so I knew it could be done.
Supplies Needed to Build DIY Industrial Coffee Table
Affiliate links are provided below for your convenience. For more information, see my full disclosure here.
- 2 8ft 2×6 Prime #2 Better Douglas Fir Lumber (Planked Top)
- 4 8ft 2×2 Select Pine Board (Frame)
- 30 #8 2.5in Screws
- Miter Saw
- Sander
- Power Drill
- Dark Walnut Wood Stain
- Ebony Wood Stain
- Polyacrylic
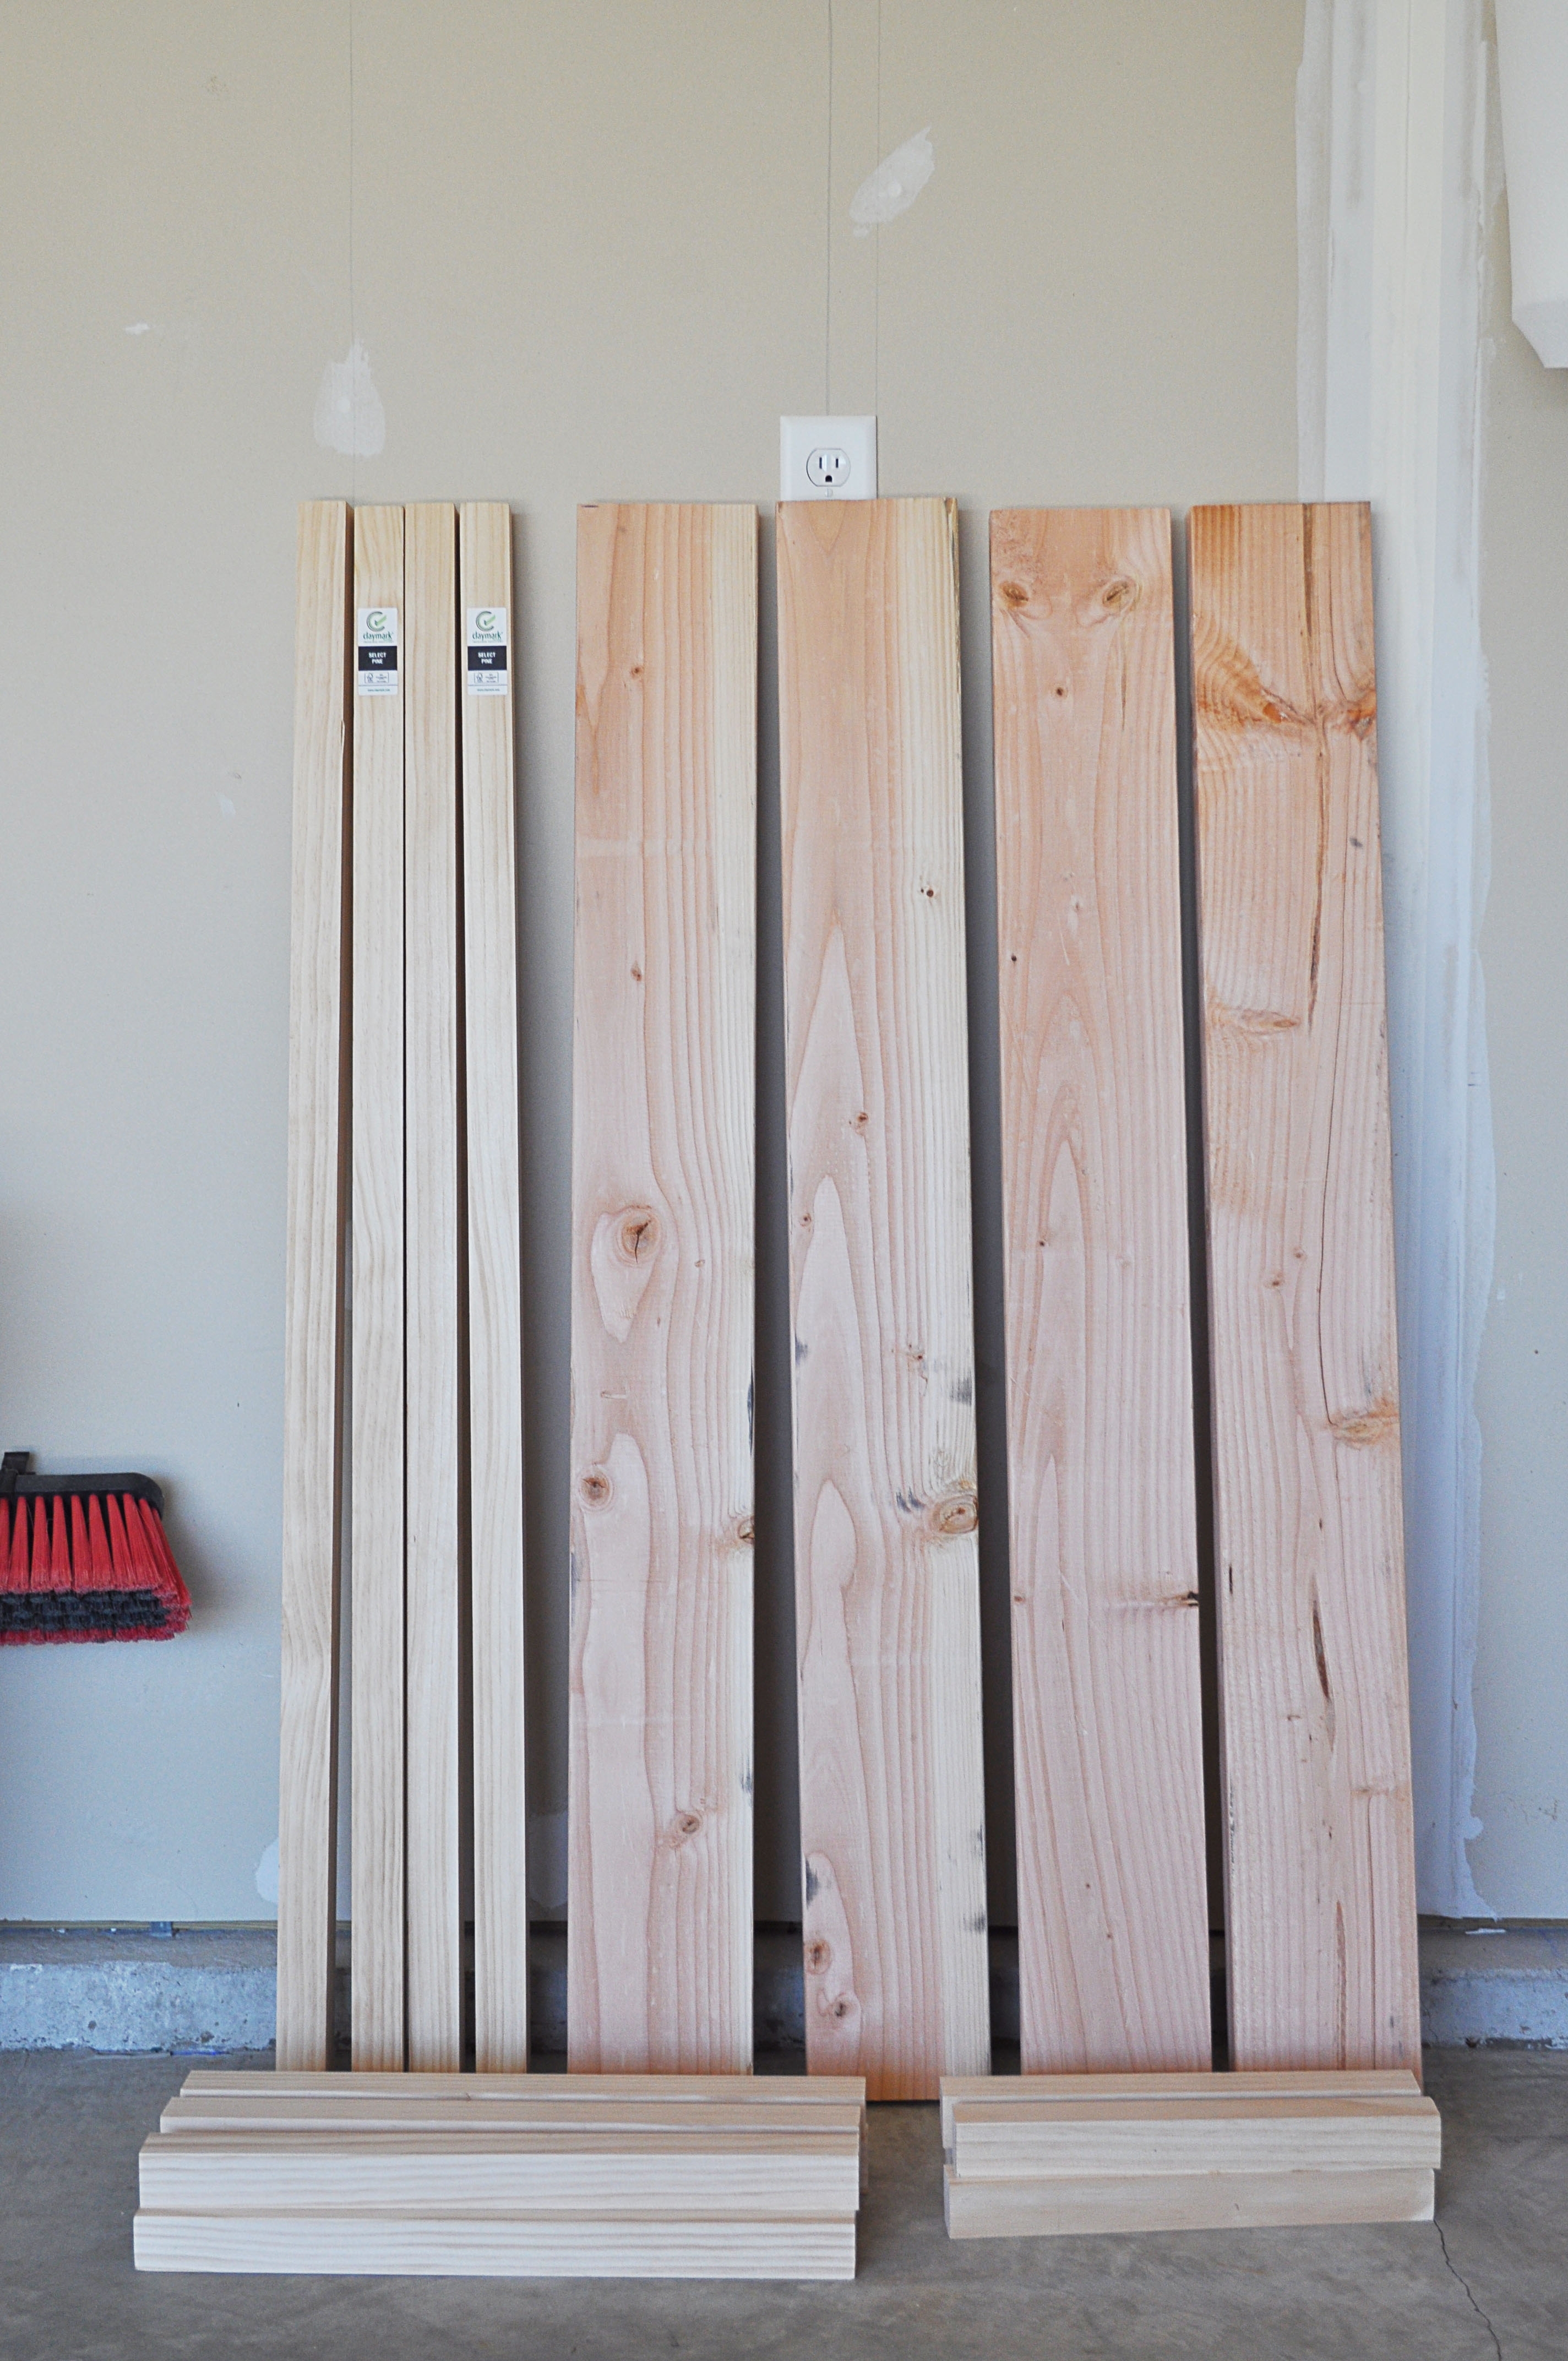
Instructions on Cutting the Wood
Tip: Take advantage of your local hardware stores cutting center. They will usually cut your wood to the size you need at little to no cost.
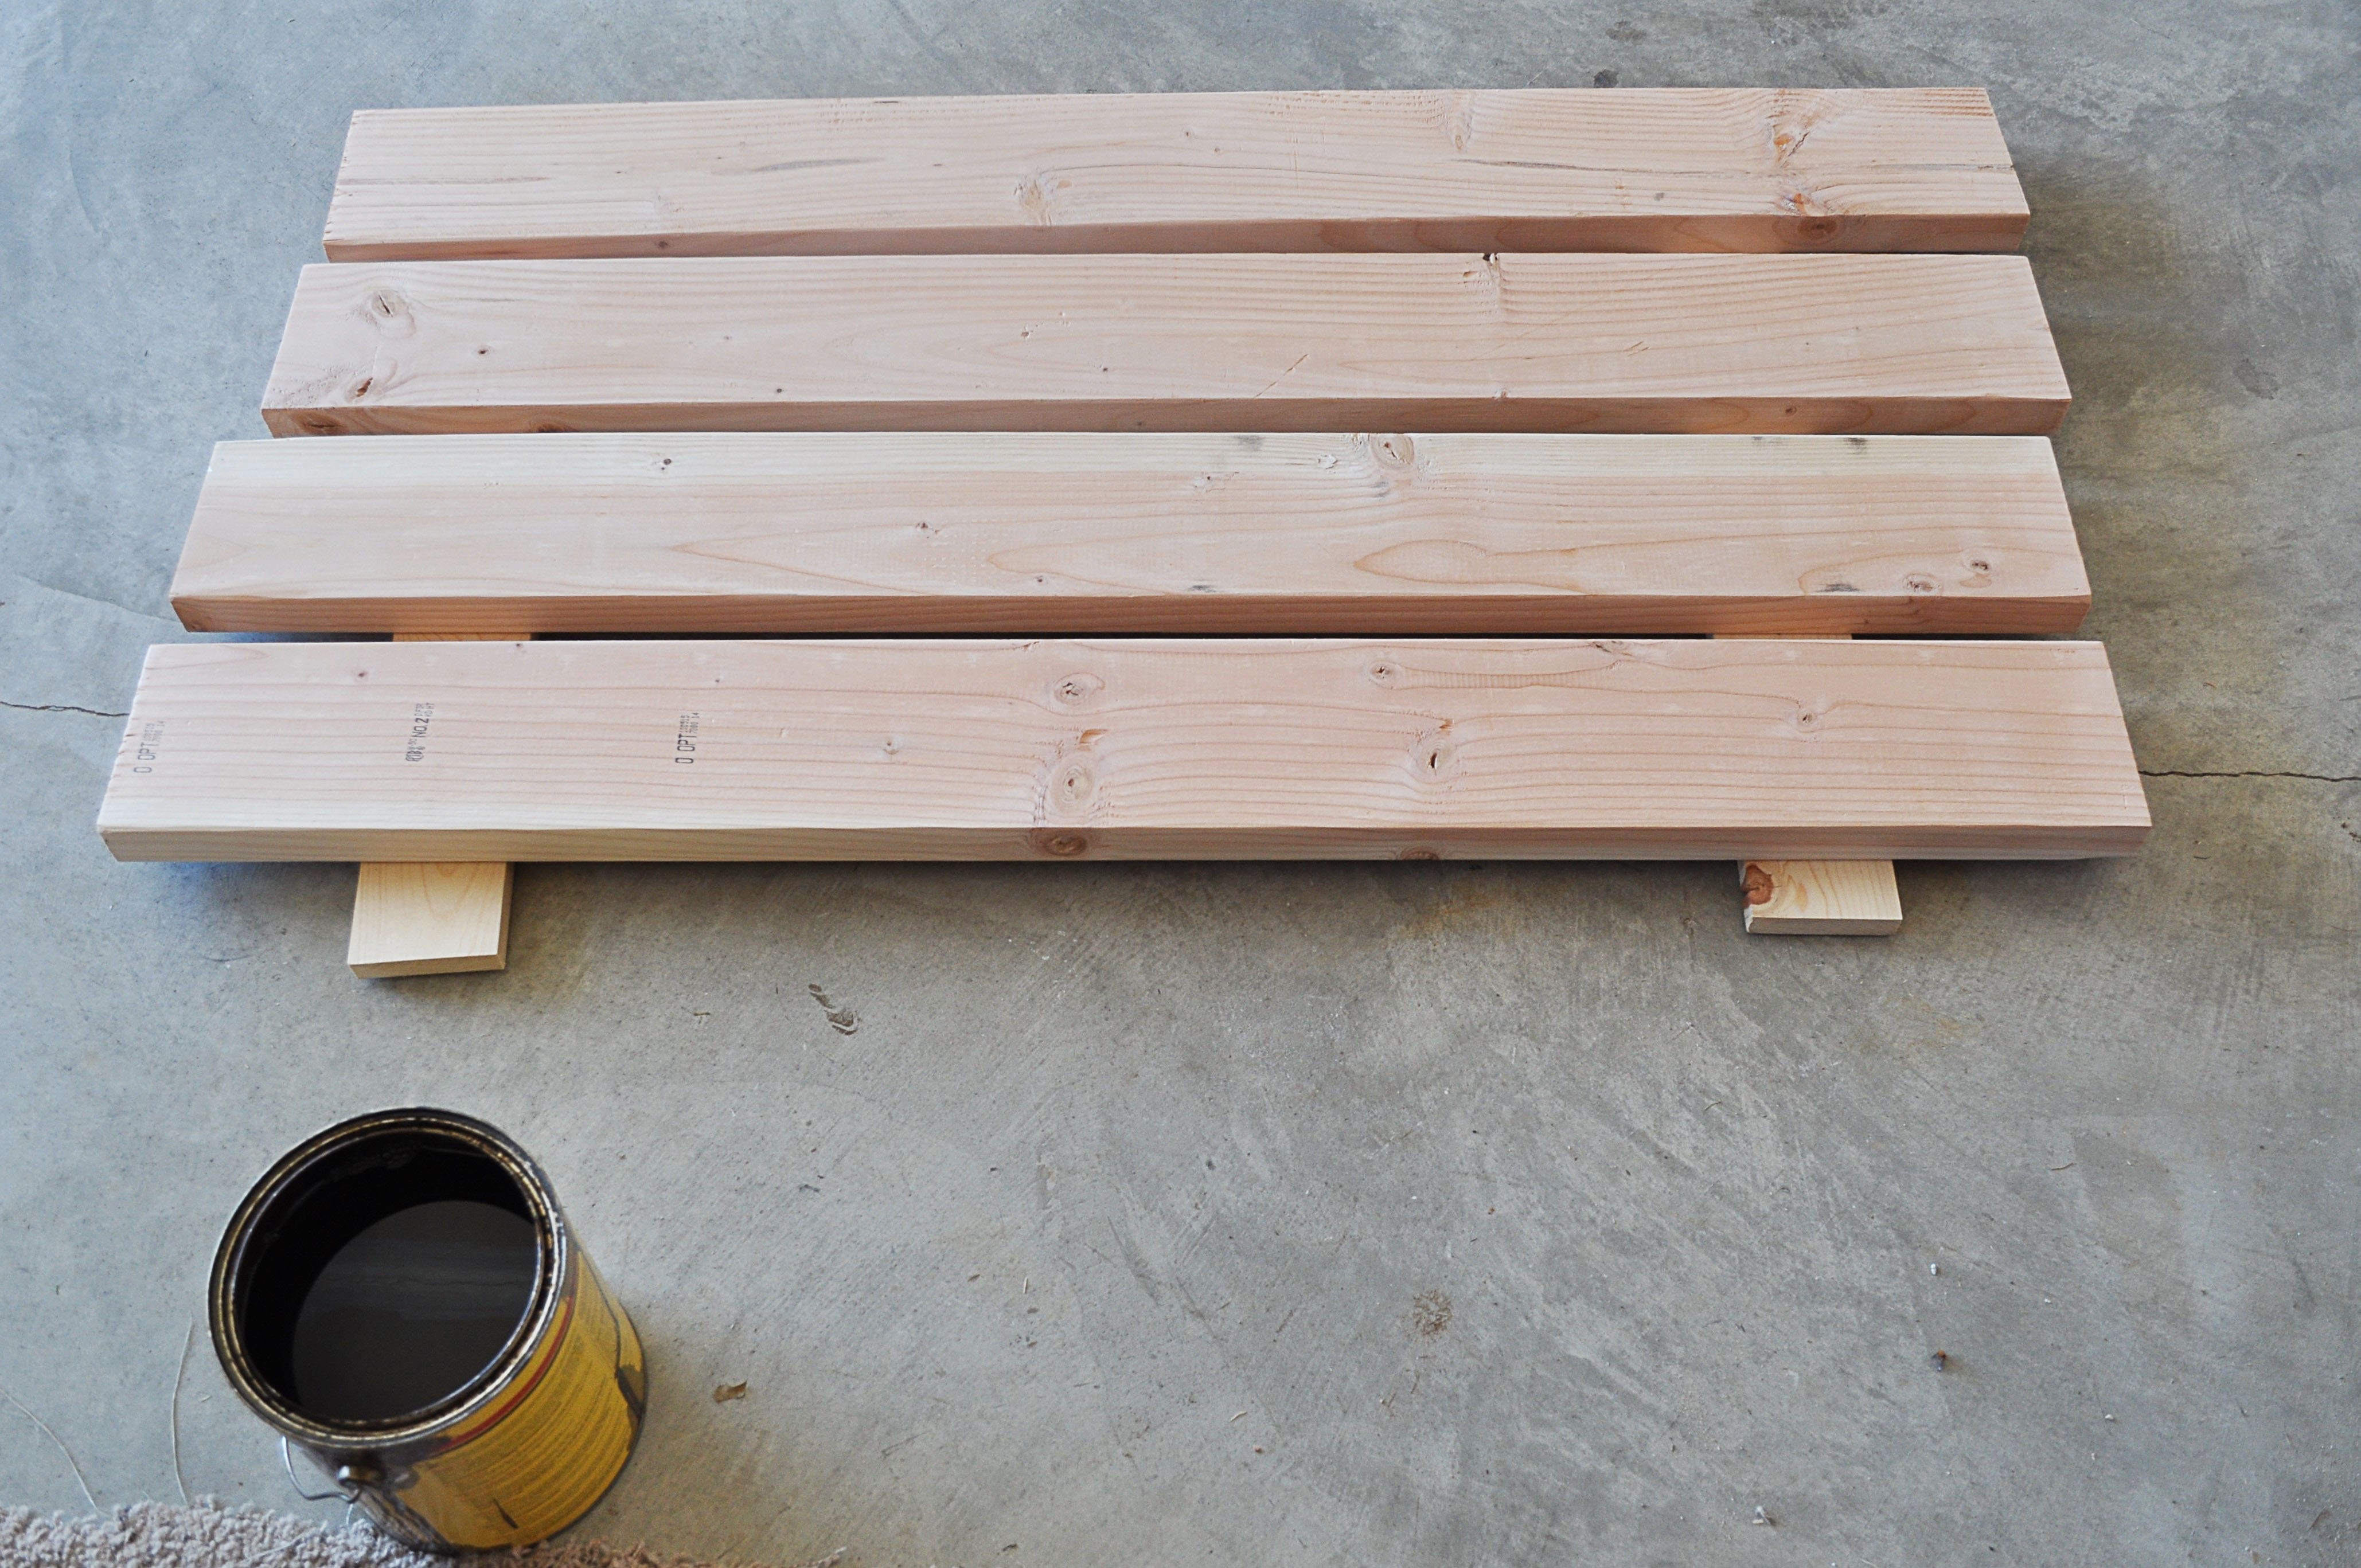
We had the two 8ft 2×6 boards cut in half to give us our four wood planks that make up the top of the table.
We had two of the 8ft 2×2 boards cut in half to give us our four 48in pieces for the top and bottom of the frame.
Once we got home we used our miter saw to make the smaller cuts: Five of the 2×2’s 20in a piece (four for the top and bottom sides of the frame and one for the middle to support the planked table top). Also, four of the 2×2’s 12in a piece for the legs. All cuts pictured below.
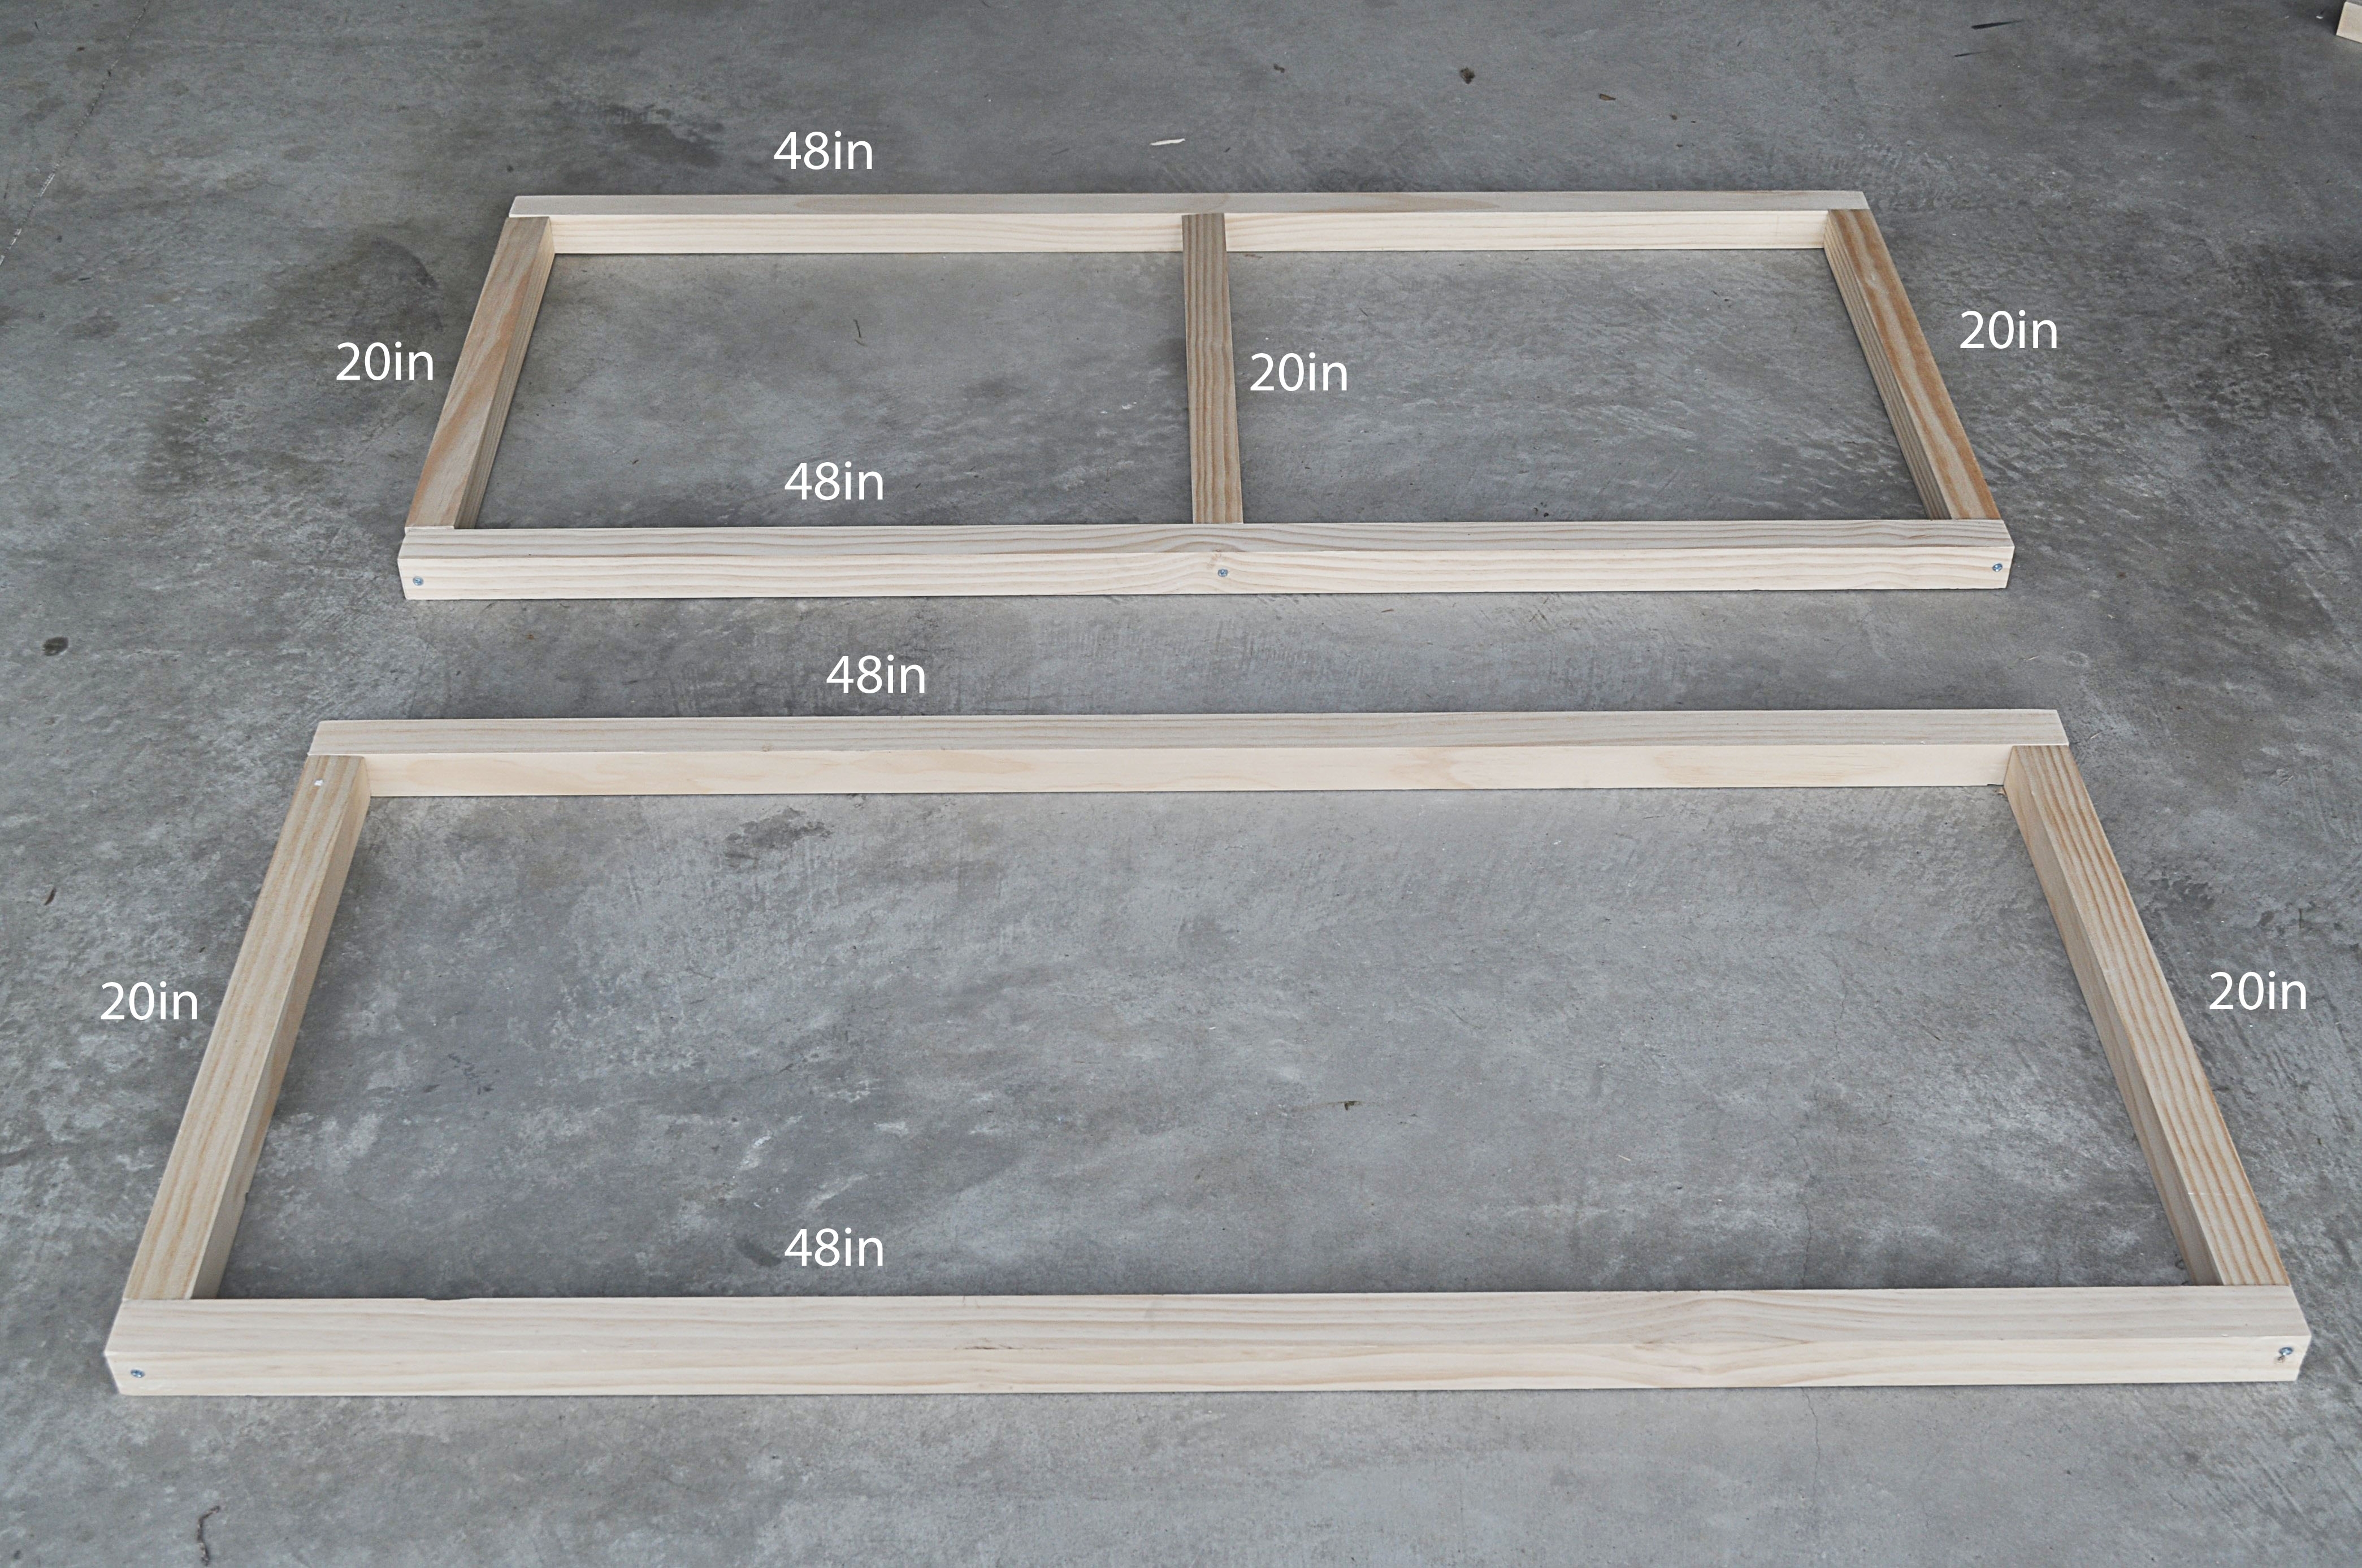
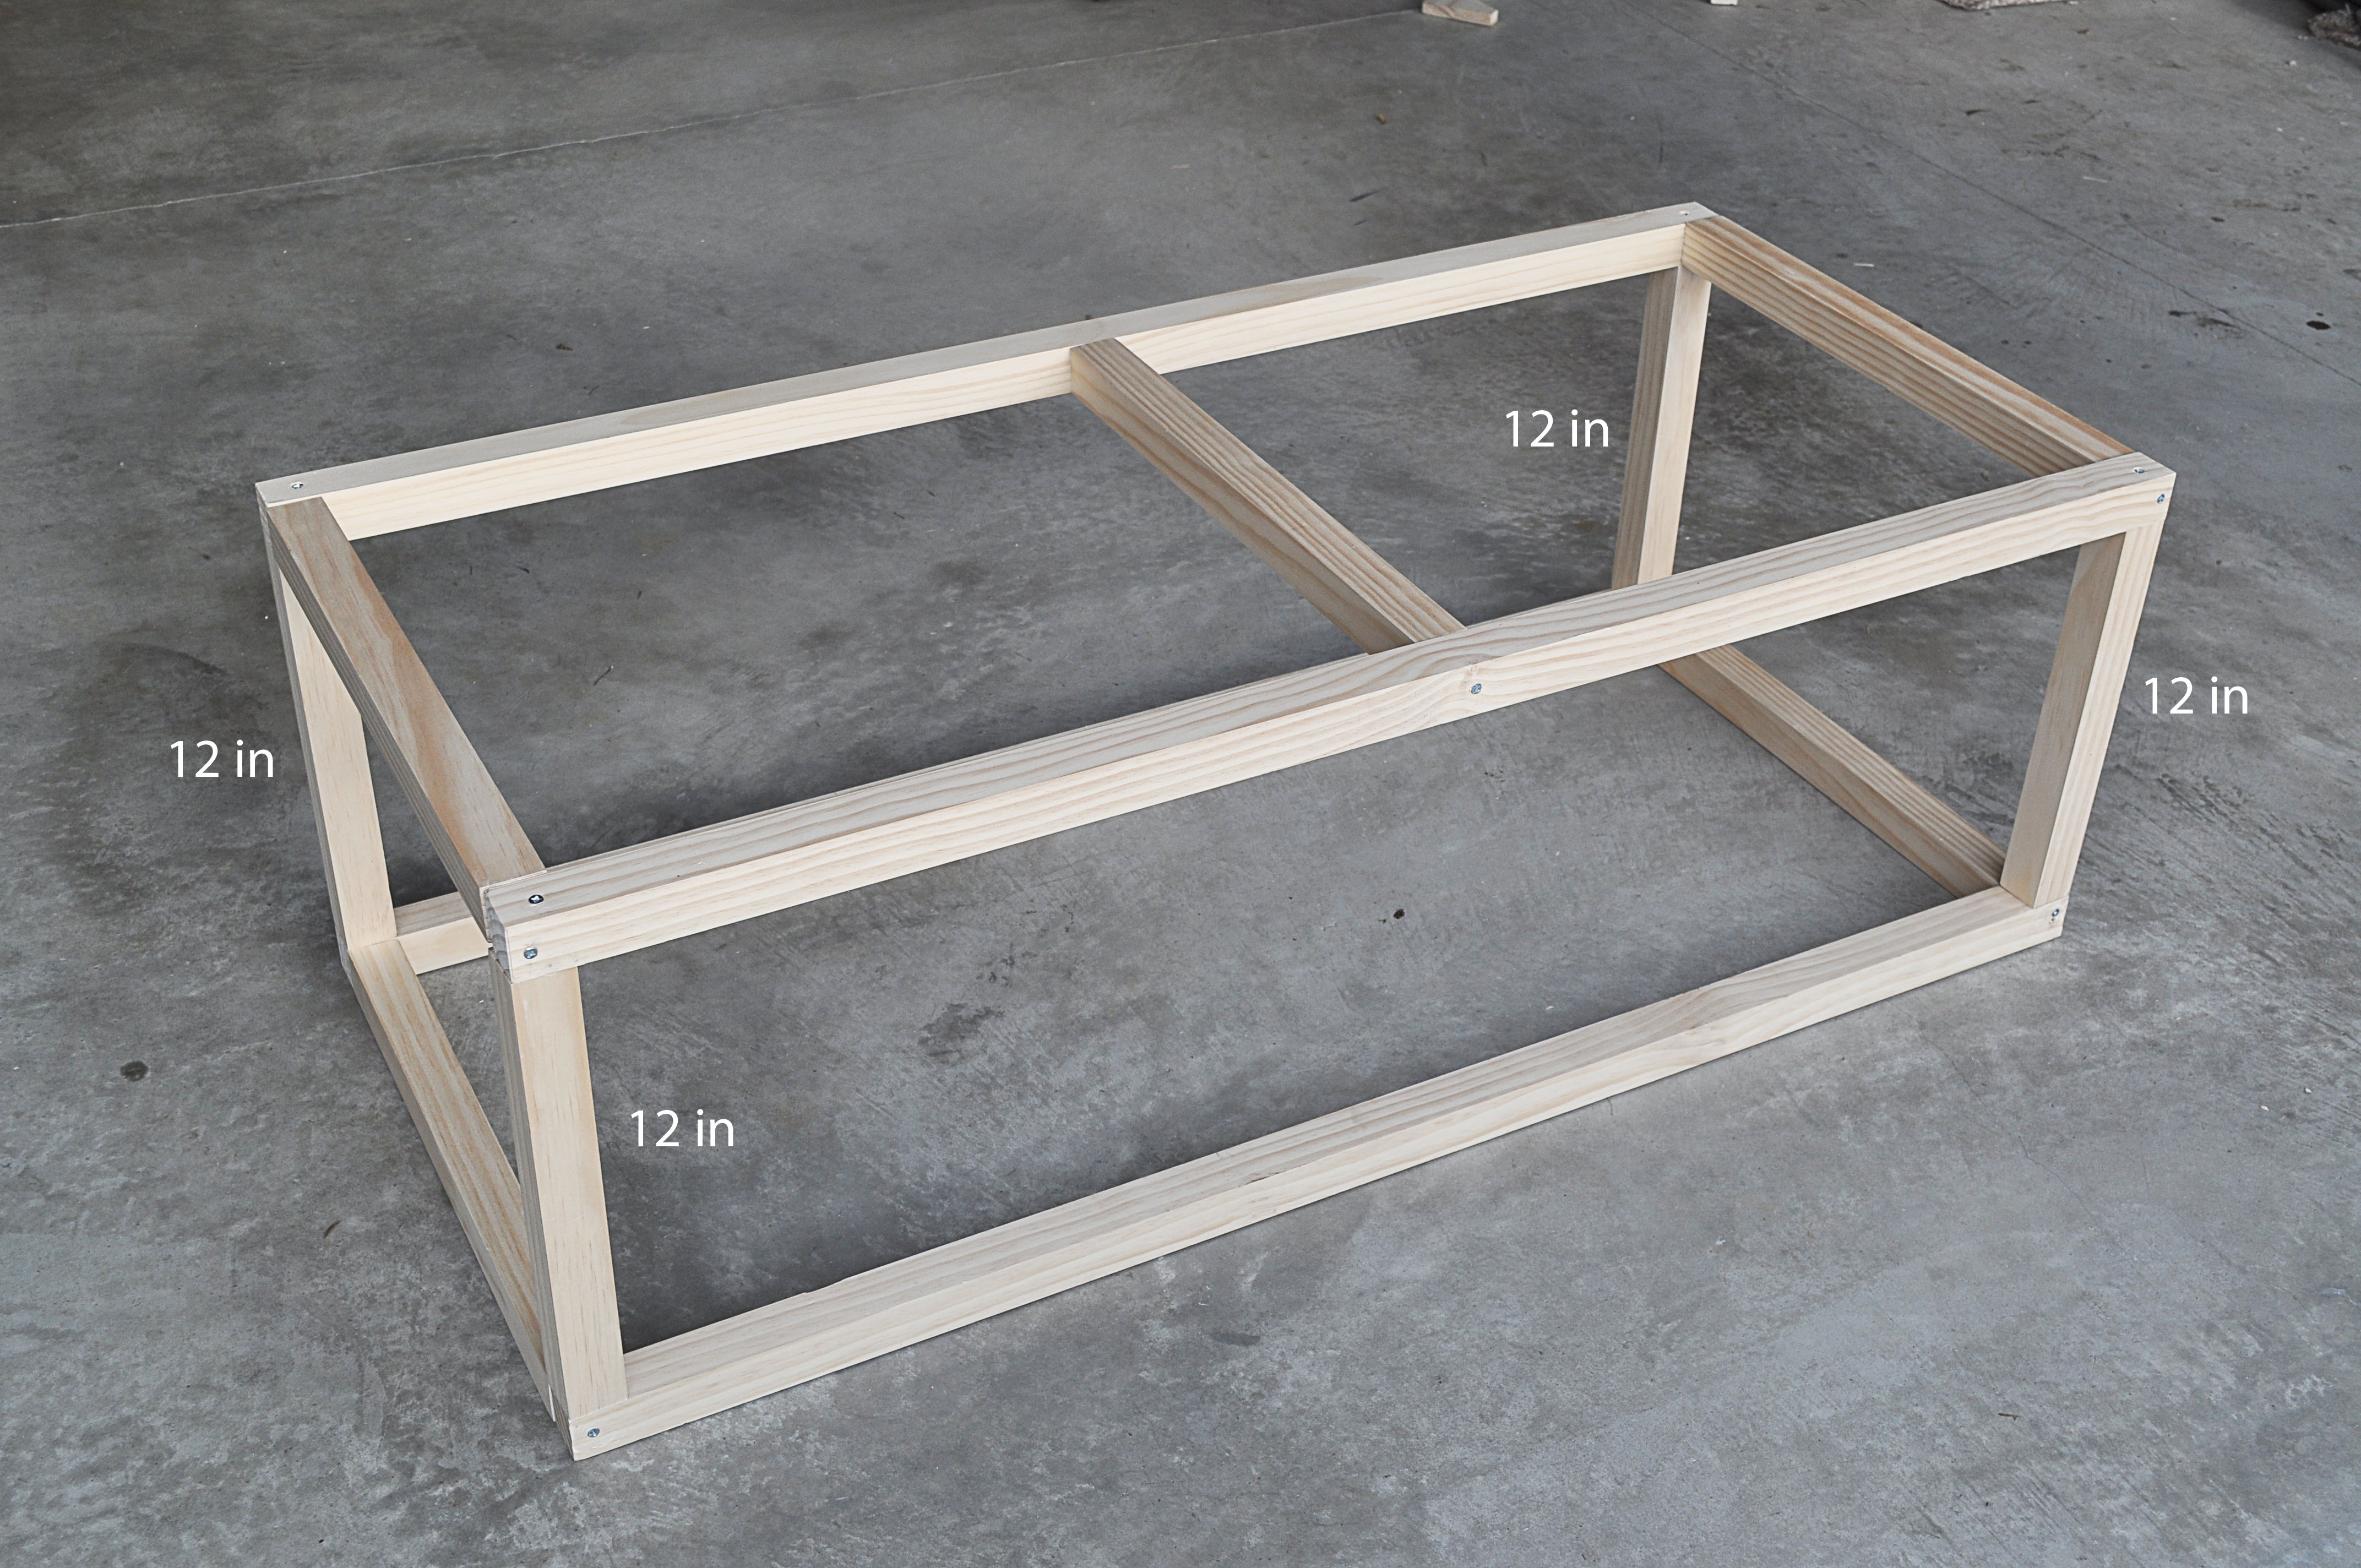
How to Assemble the Frame of Table
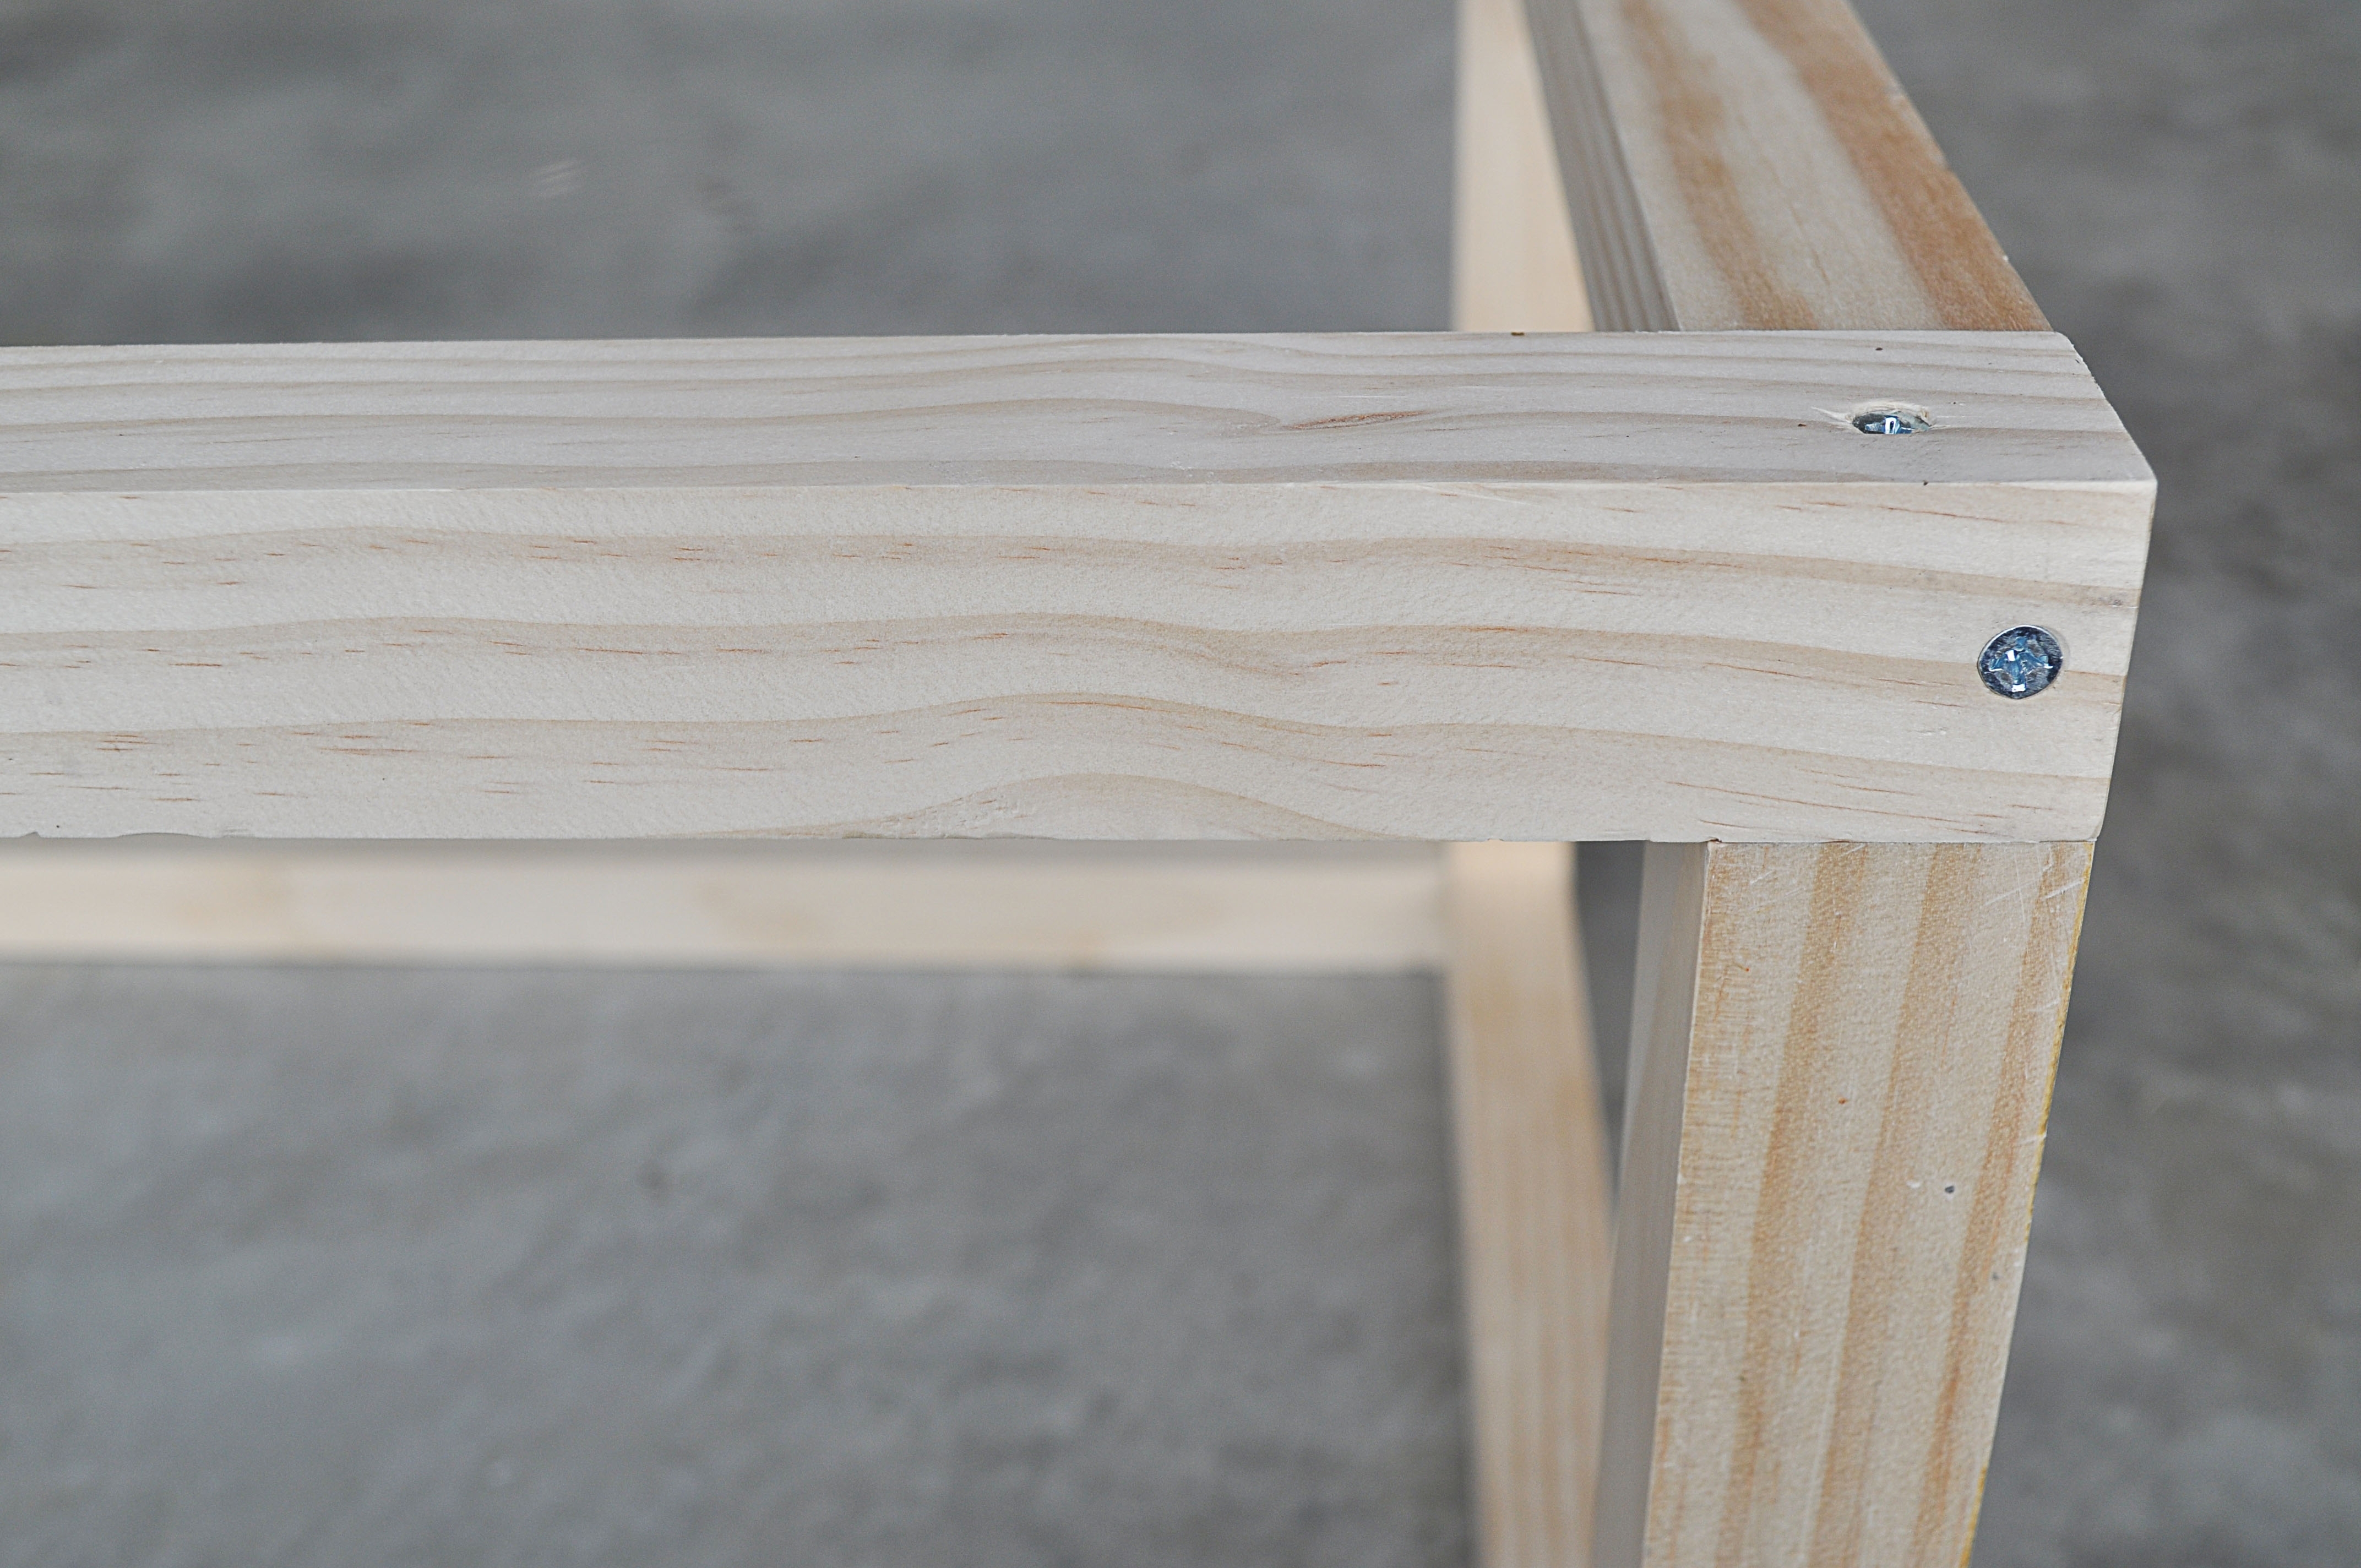
When assembling the frame, the position of the screws were kind of tricky. There were two 2.5in screws being drilled into each of the eight corners in very close proximity.
We just made sure they didn’t run into each other, as pictured below. Or with a Kreg Jig, you can create pocket holes if you would like instead. Two additional screws were used to attach the middle support piece as well.
Sand, Stain, and Seal the Wood
For the planked wood table top, I sanded down the wood then used my favorite Dark Walnut wood stain to stain all four pieces.
For the legs, I used two coats of Ebony wood stain which actually gave it the slight metallic look I was hoping. Since most of these tables have steel looking legs.
Once everything was dry, I used clear matte polyacrylic to seal all pieces.
How to Attach Planked Table Top To Frame
The remaining twelve screws were used to attach the planked table top to the top 20in pieces of the frame, three screws per plank.
We flipped the table over to complete this part from the underneath so the screws would be hidden. (NOTE: We spaced out the planks a tiny bit on the top so they would be flush in width to the frame).
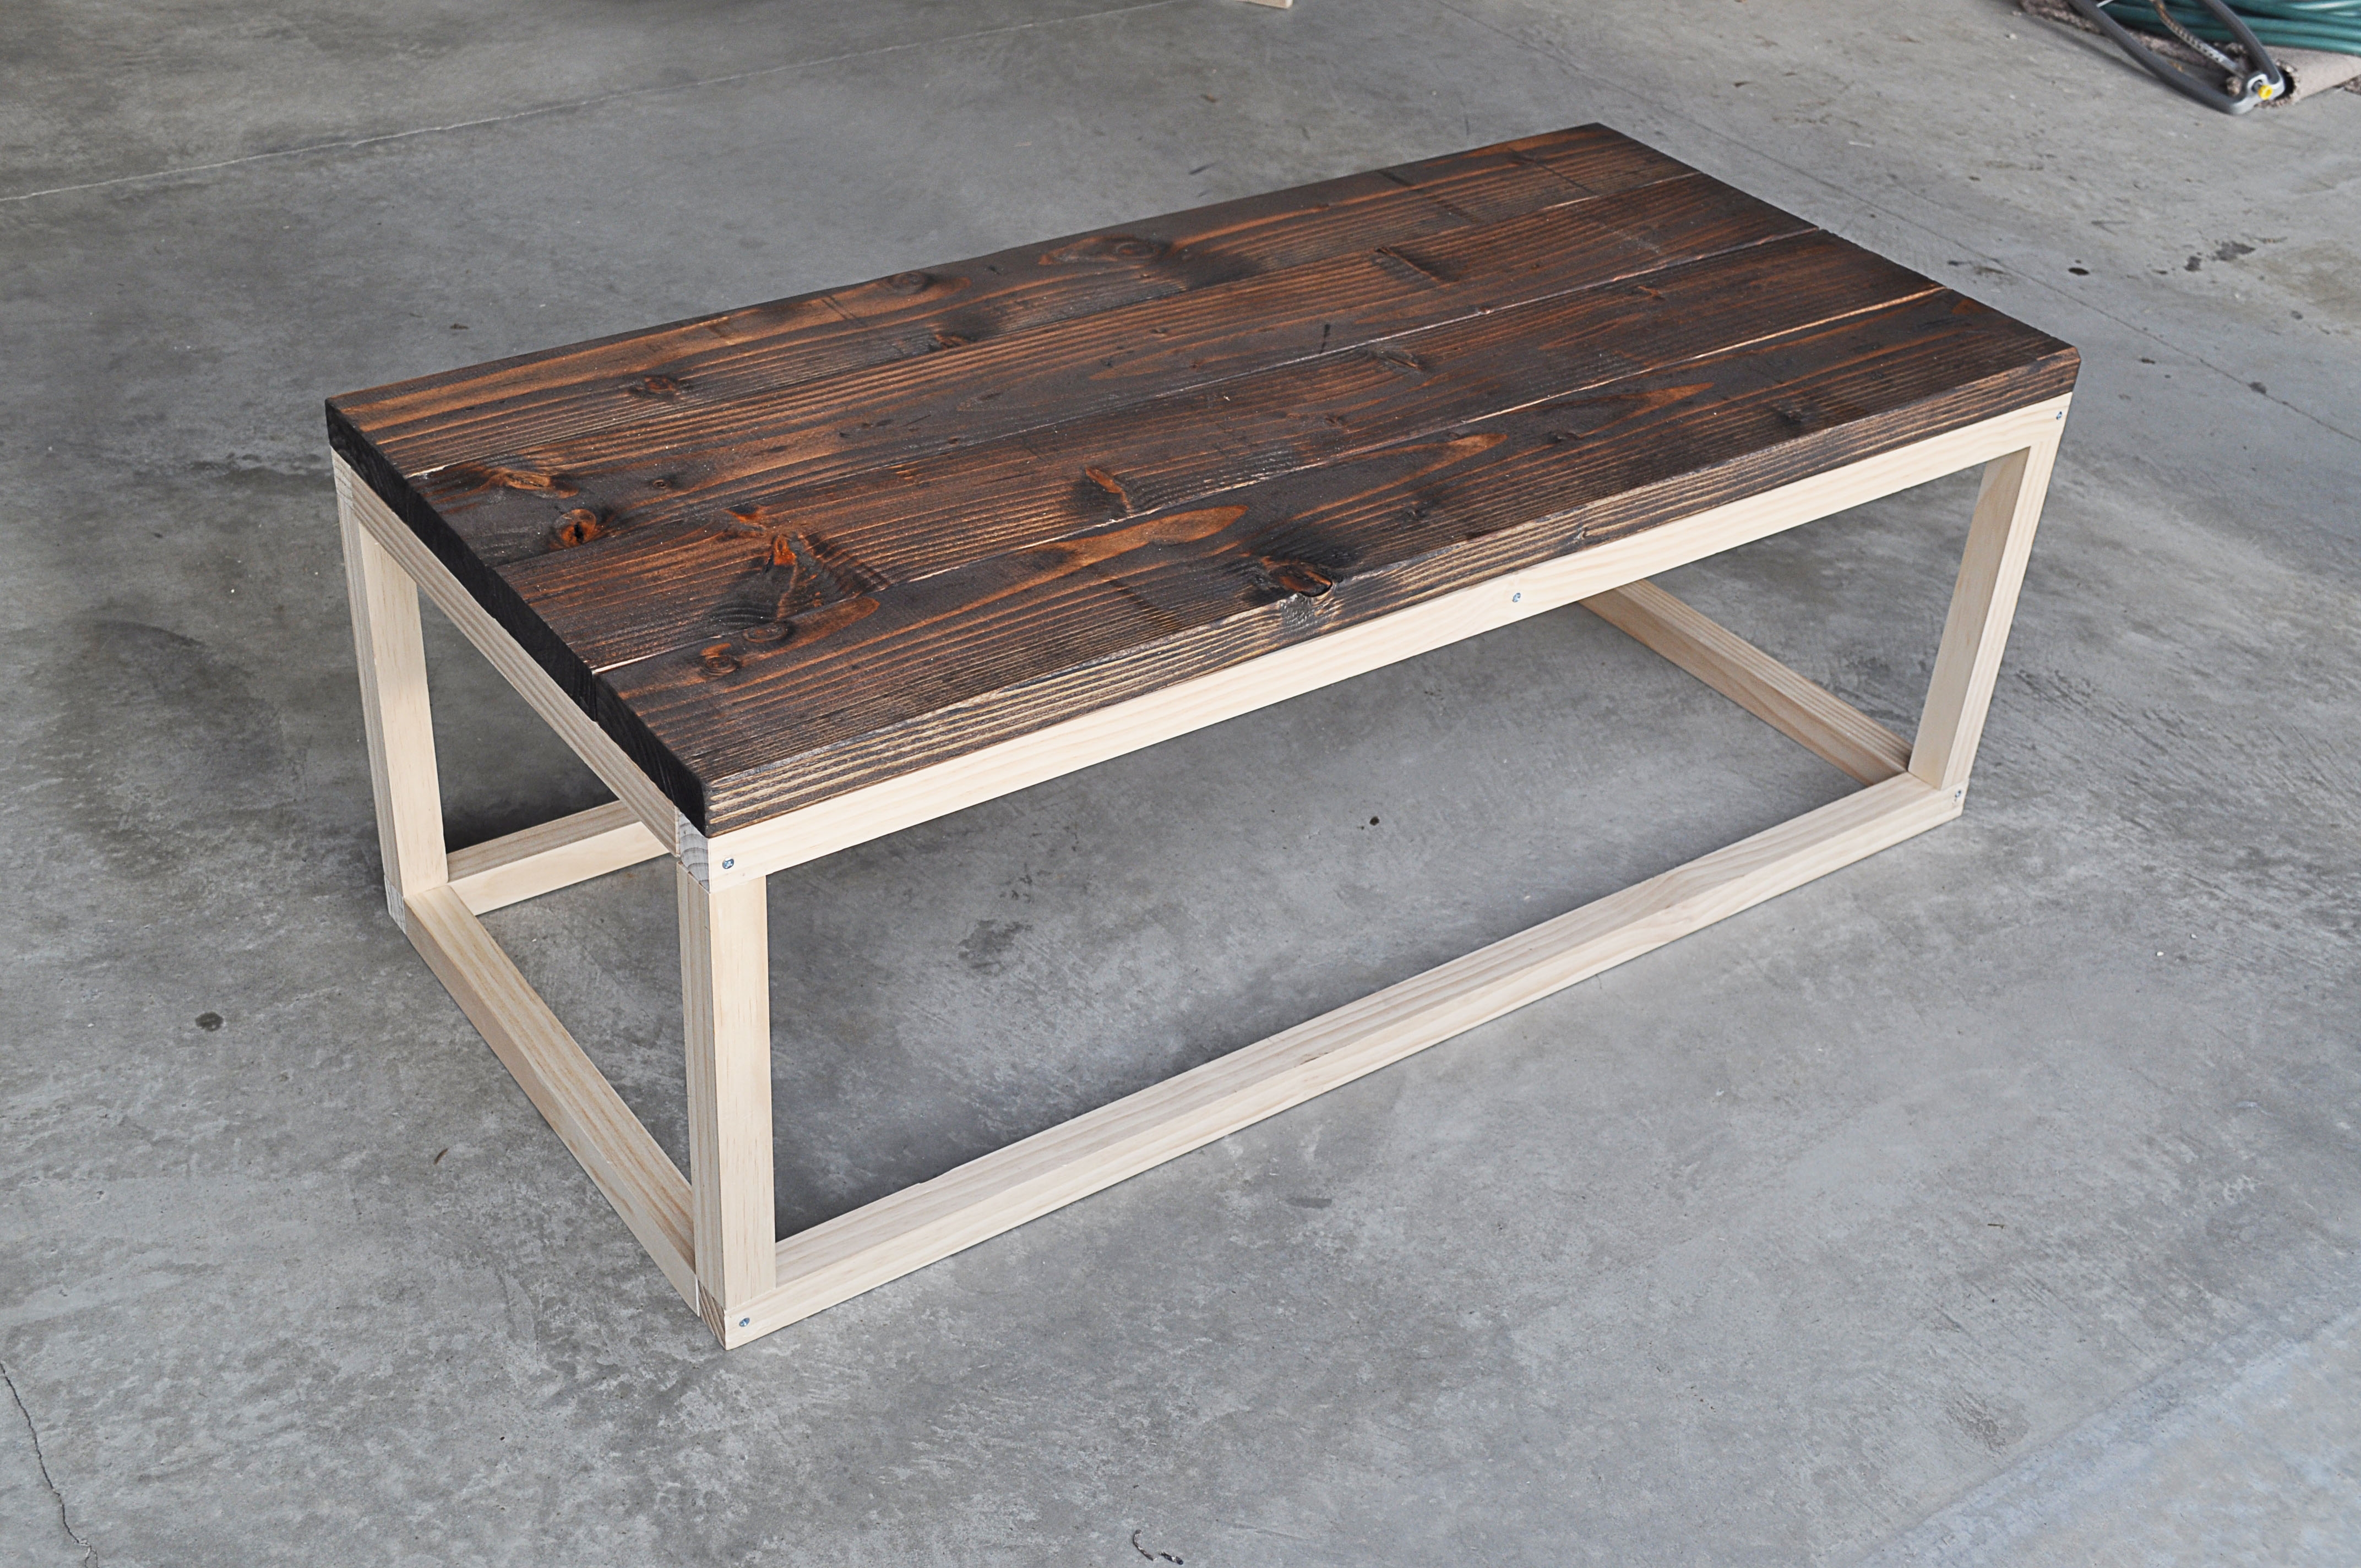
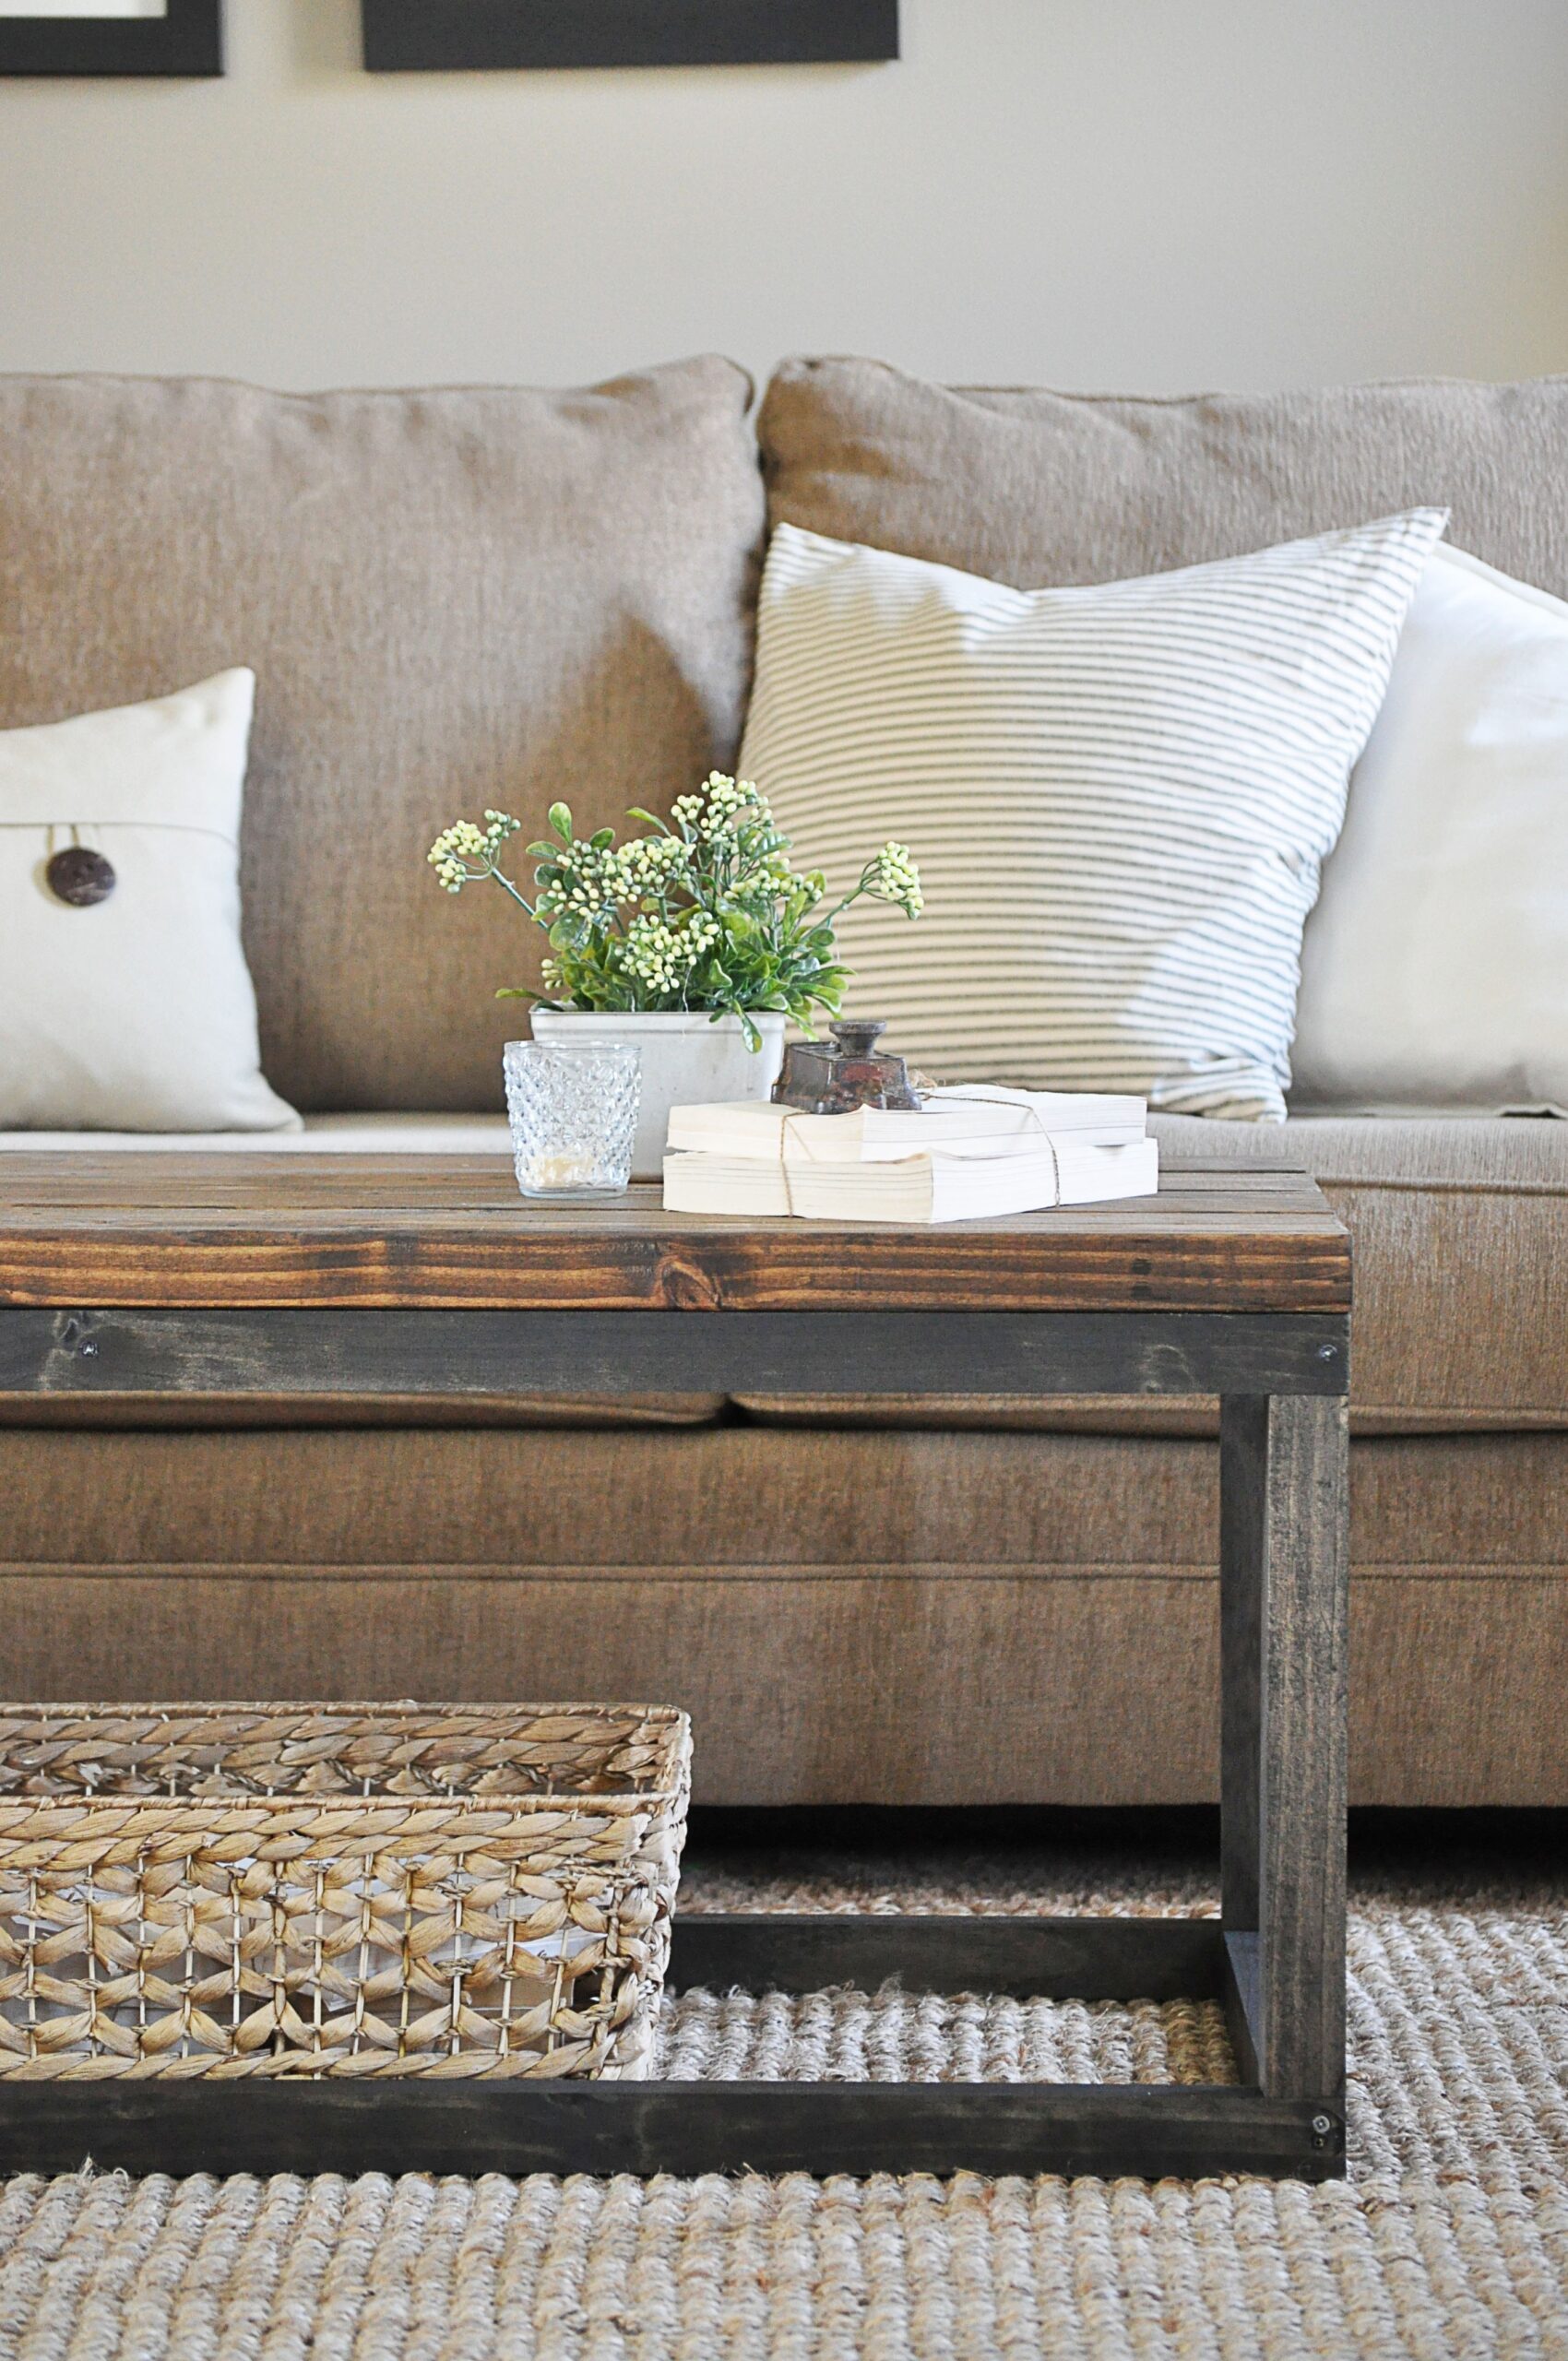
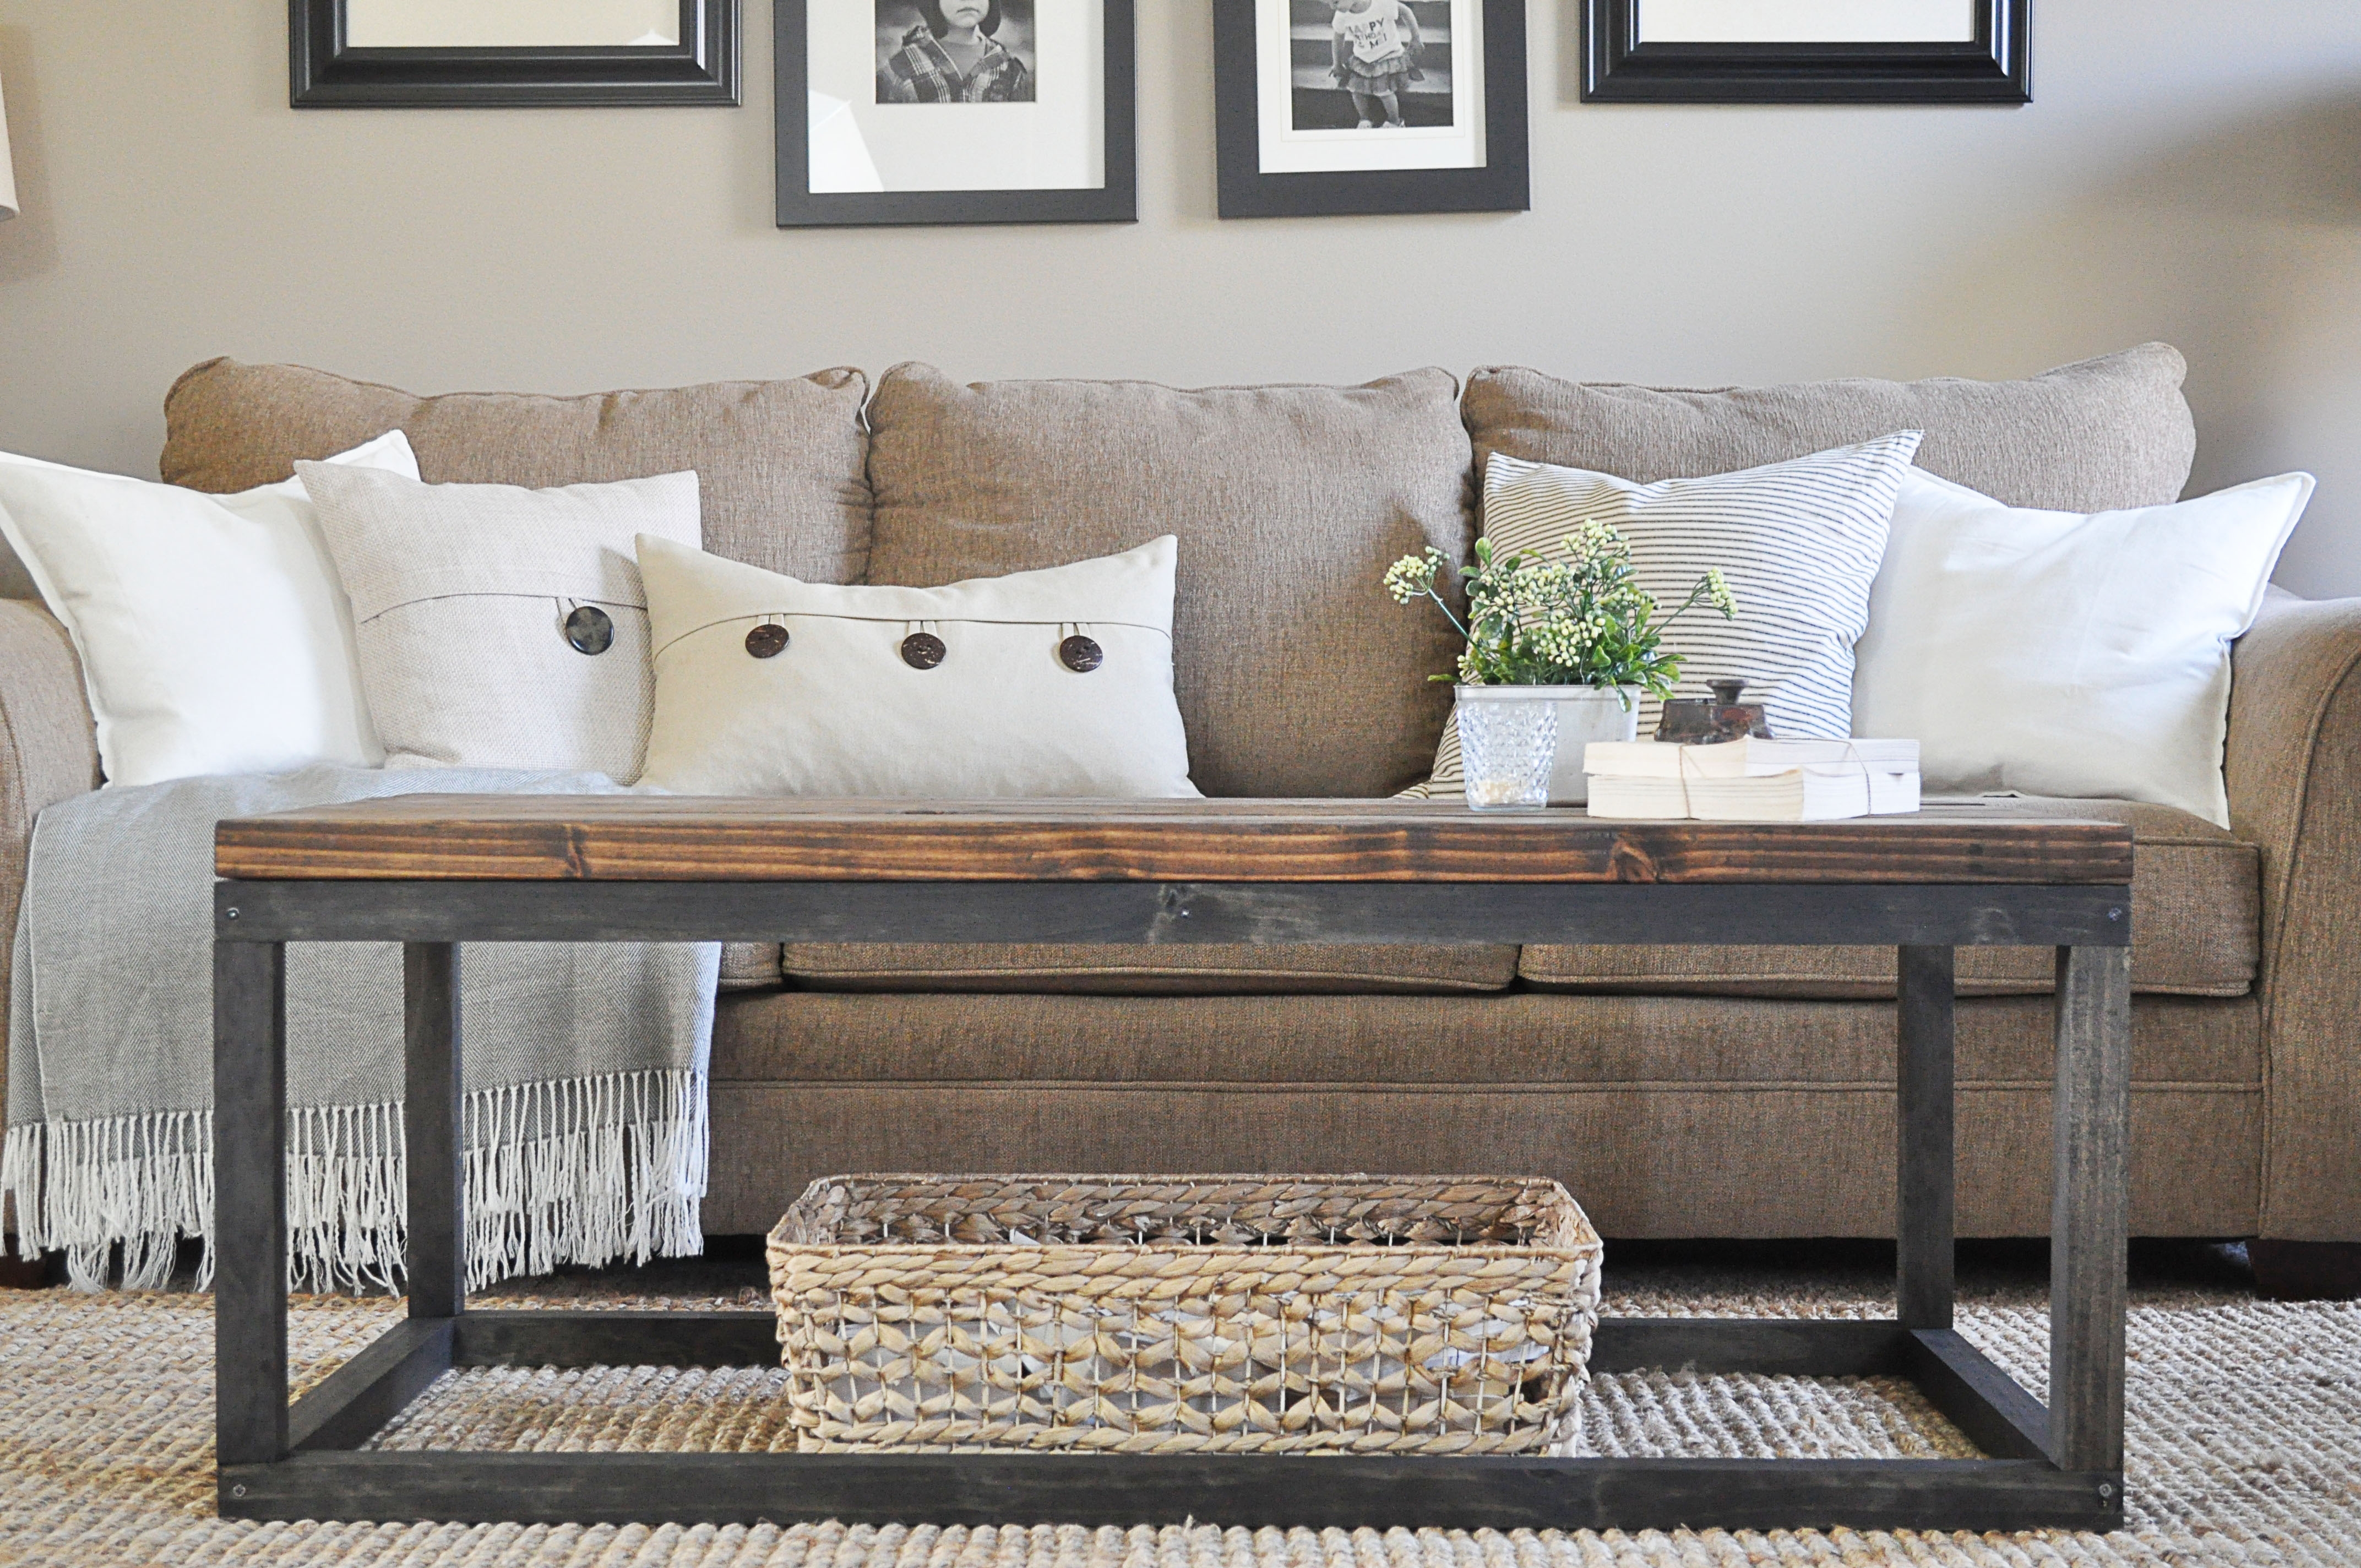
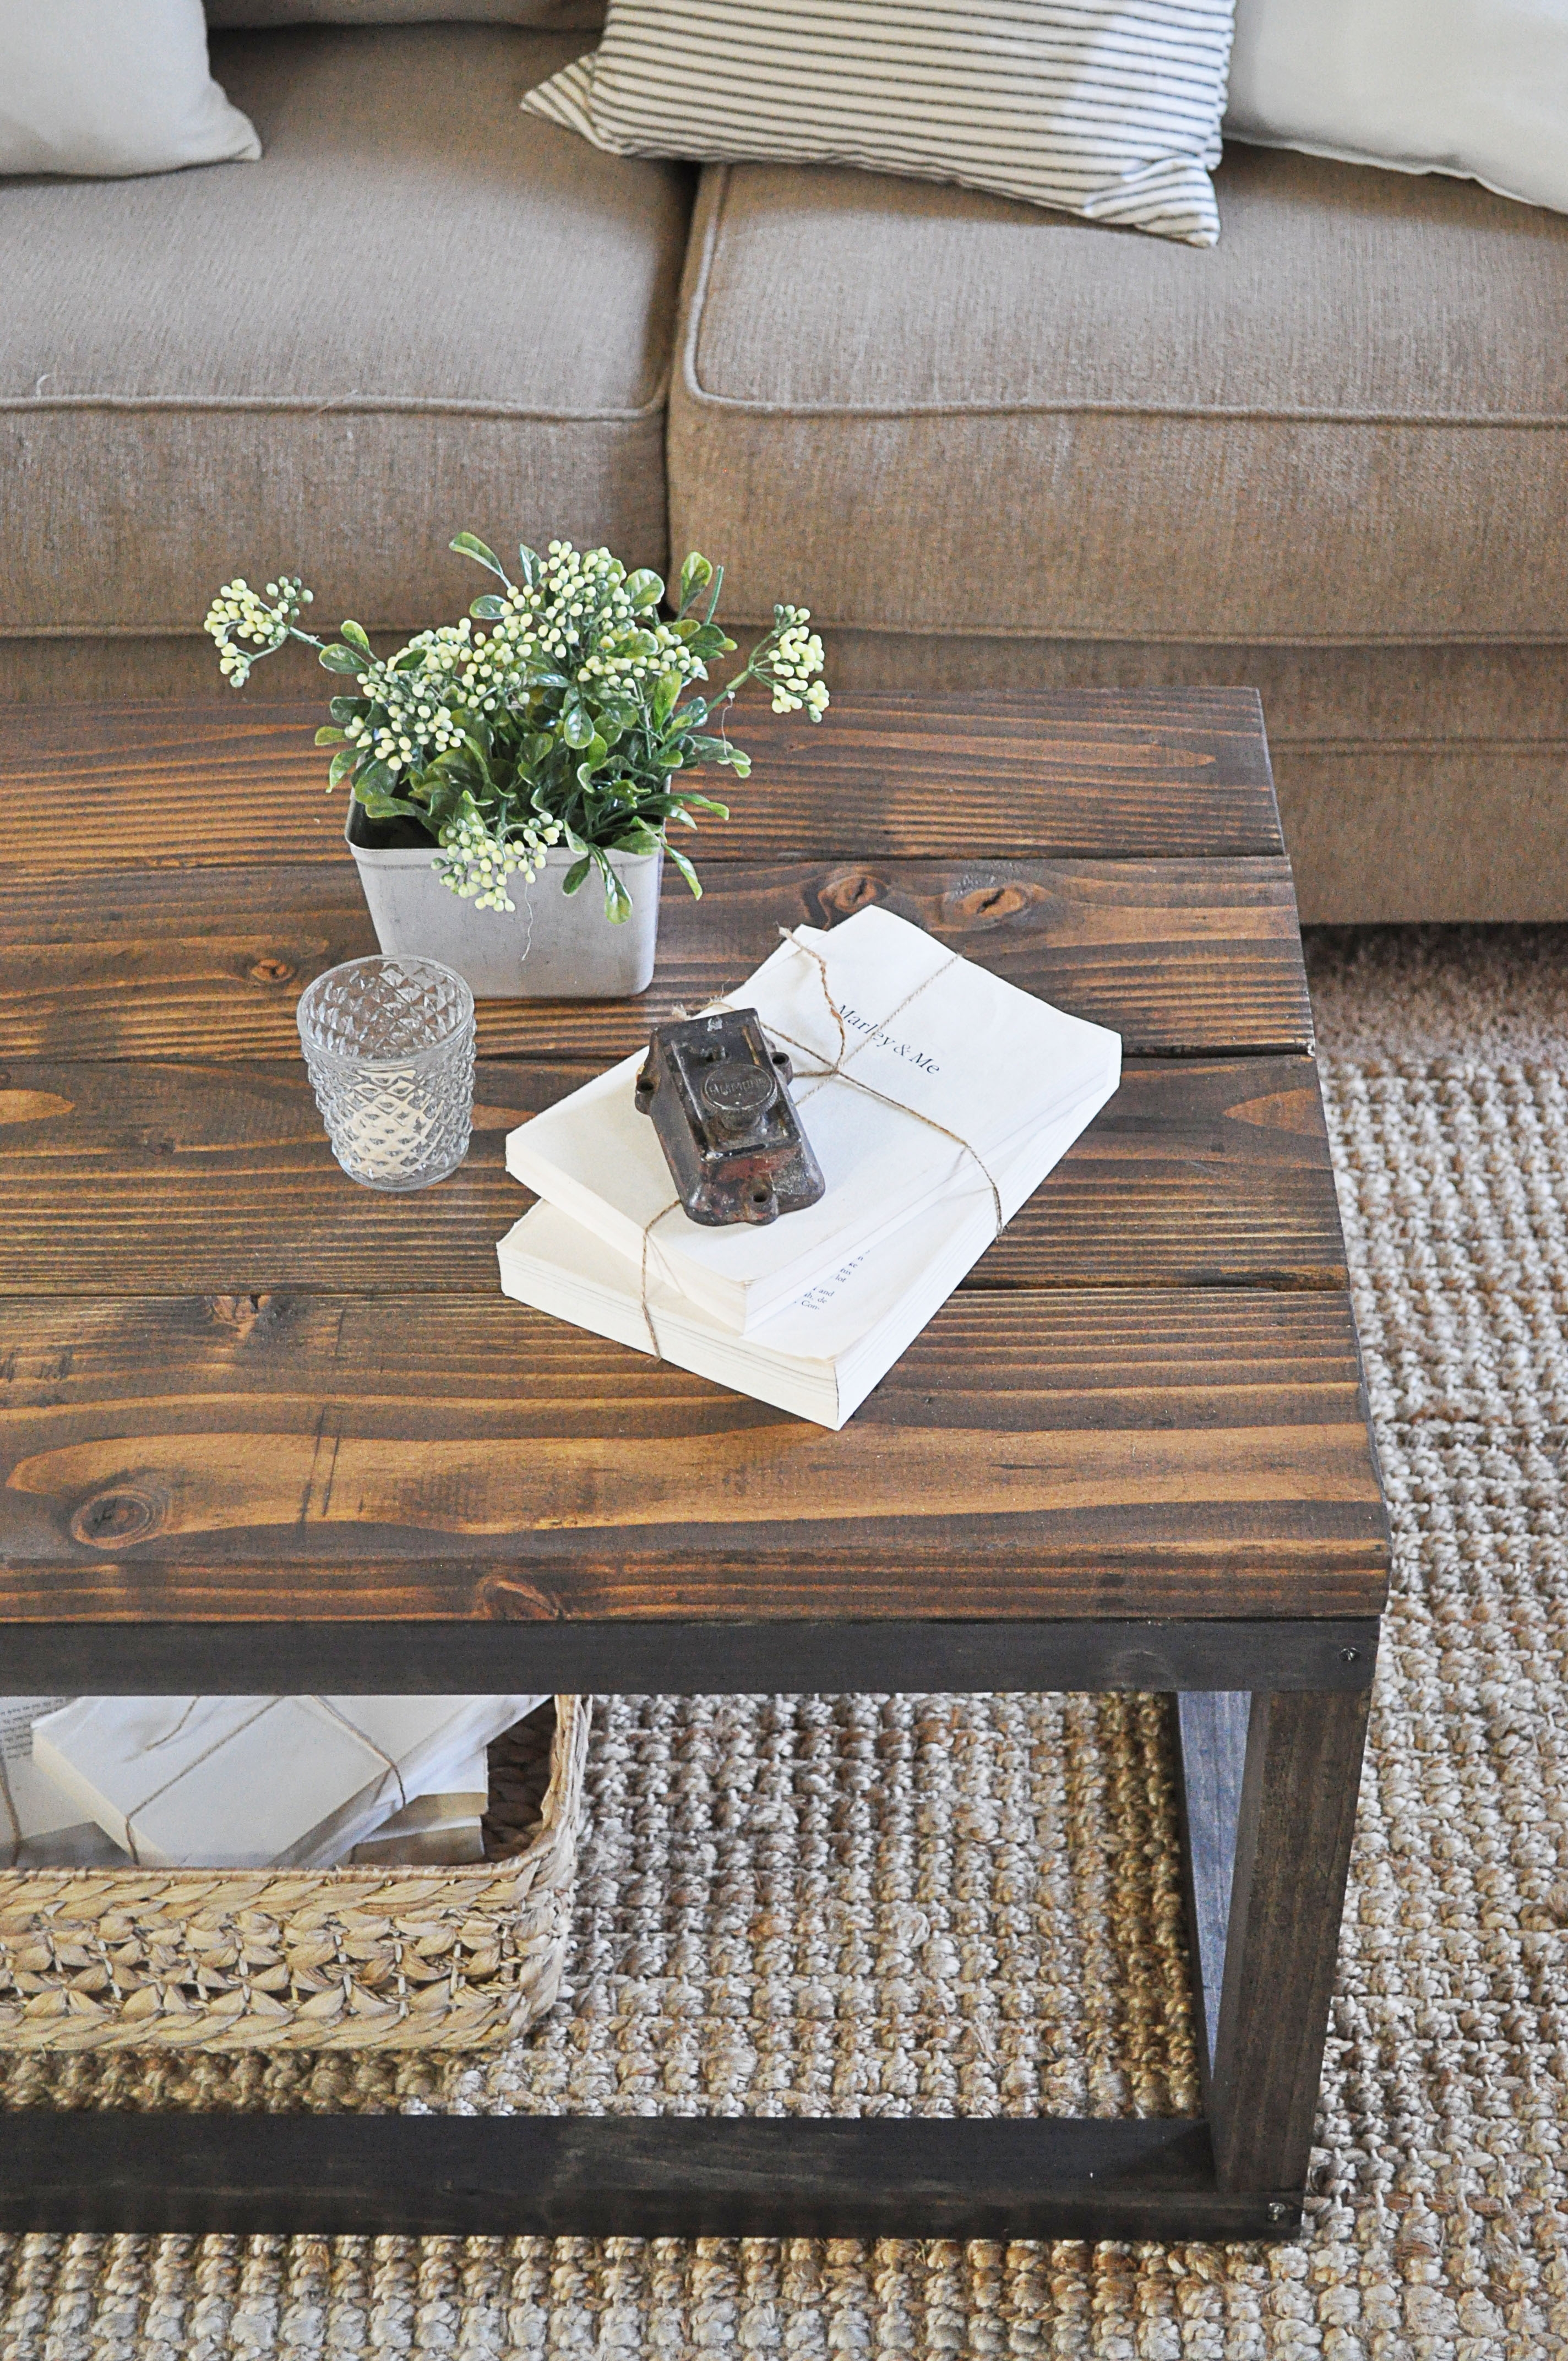
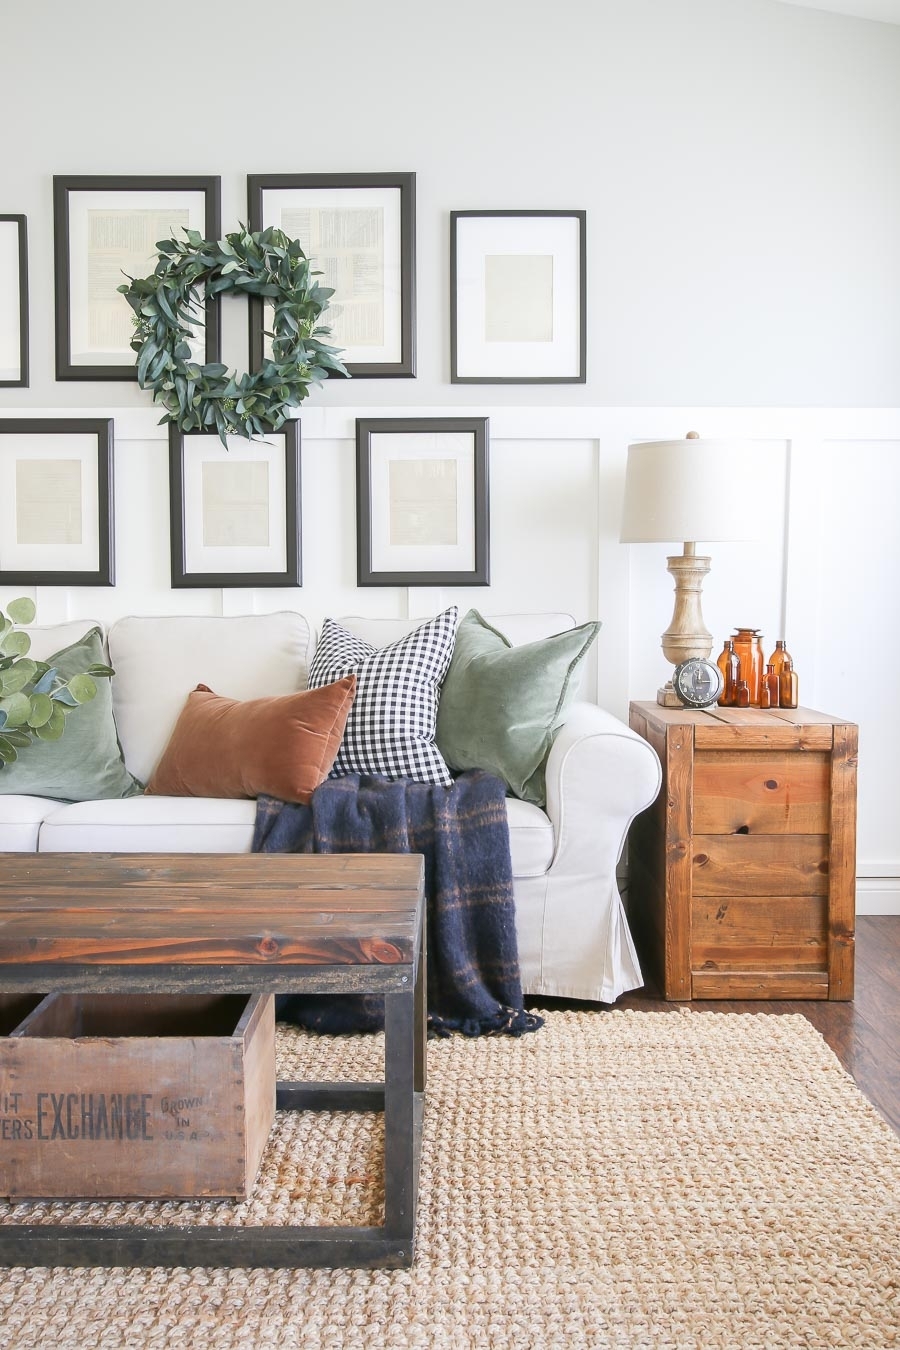
The Completed DIY Industrial Coffee Table
Would you believe me if I told you the complete cost of this DIY Industrial Coffee Table is under $75.00? And honestly the project itself is not hard.
I know that power tools can feel intimidating if you don’t know how to use them. However, if you get your cuts done for you at your local hardware store, all you have to do is stain or paint your table, and assemble it. It really is that easy.
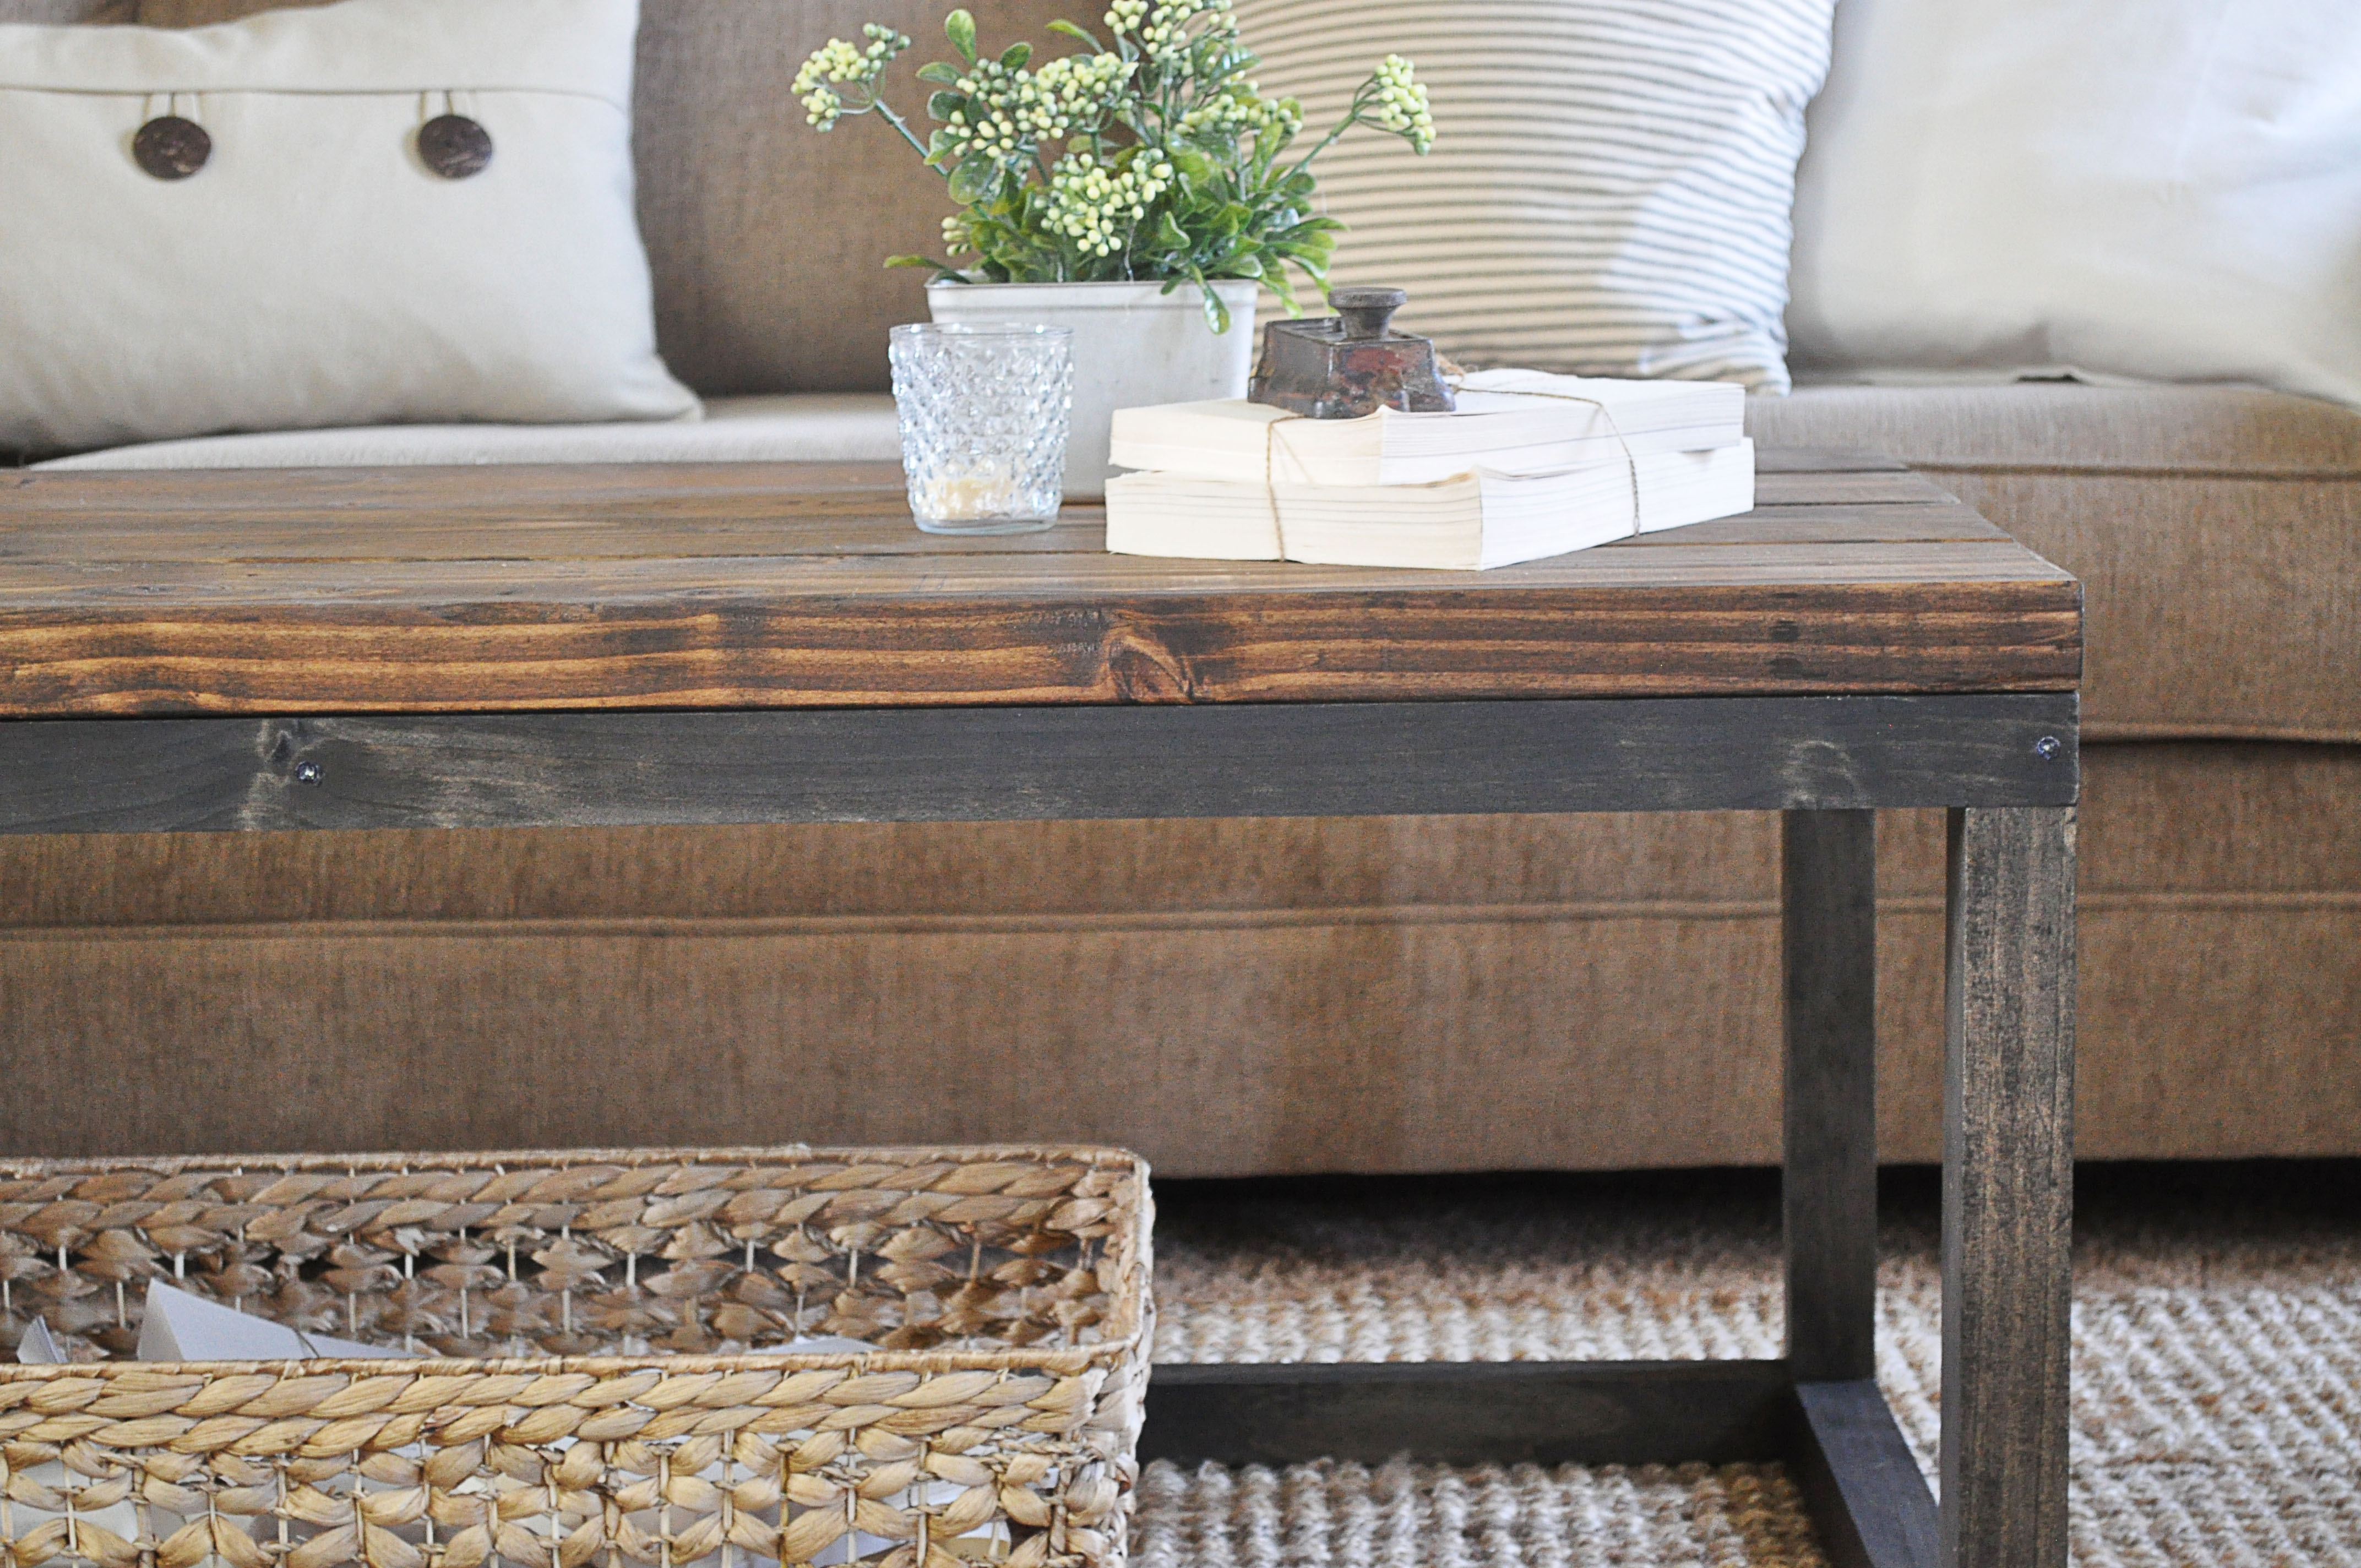
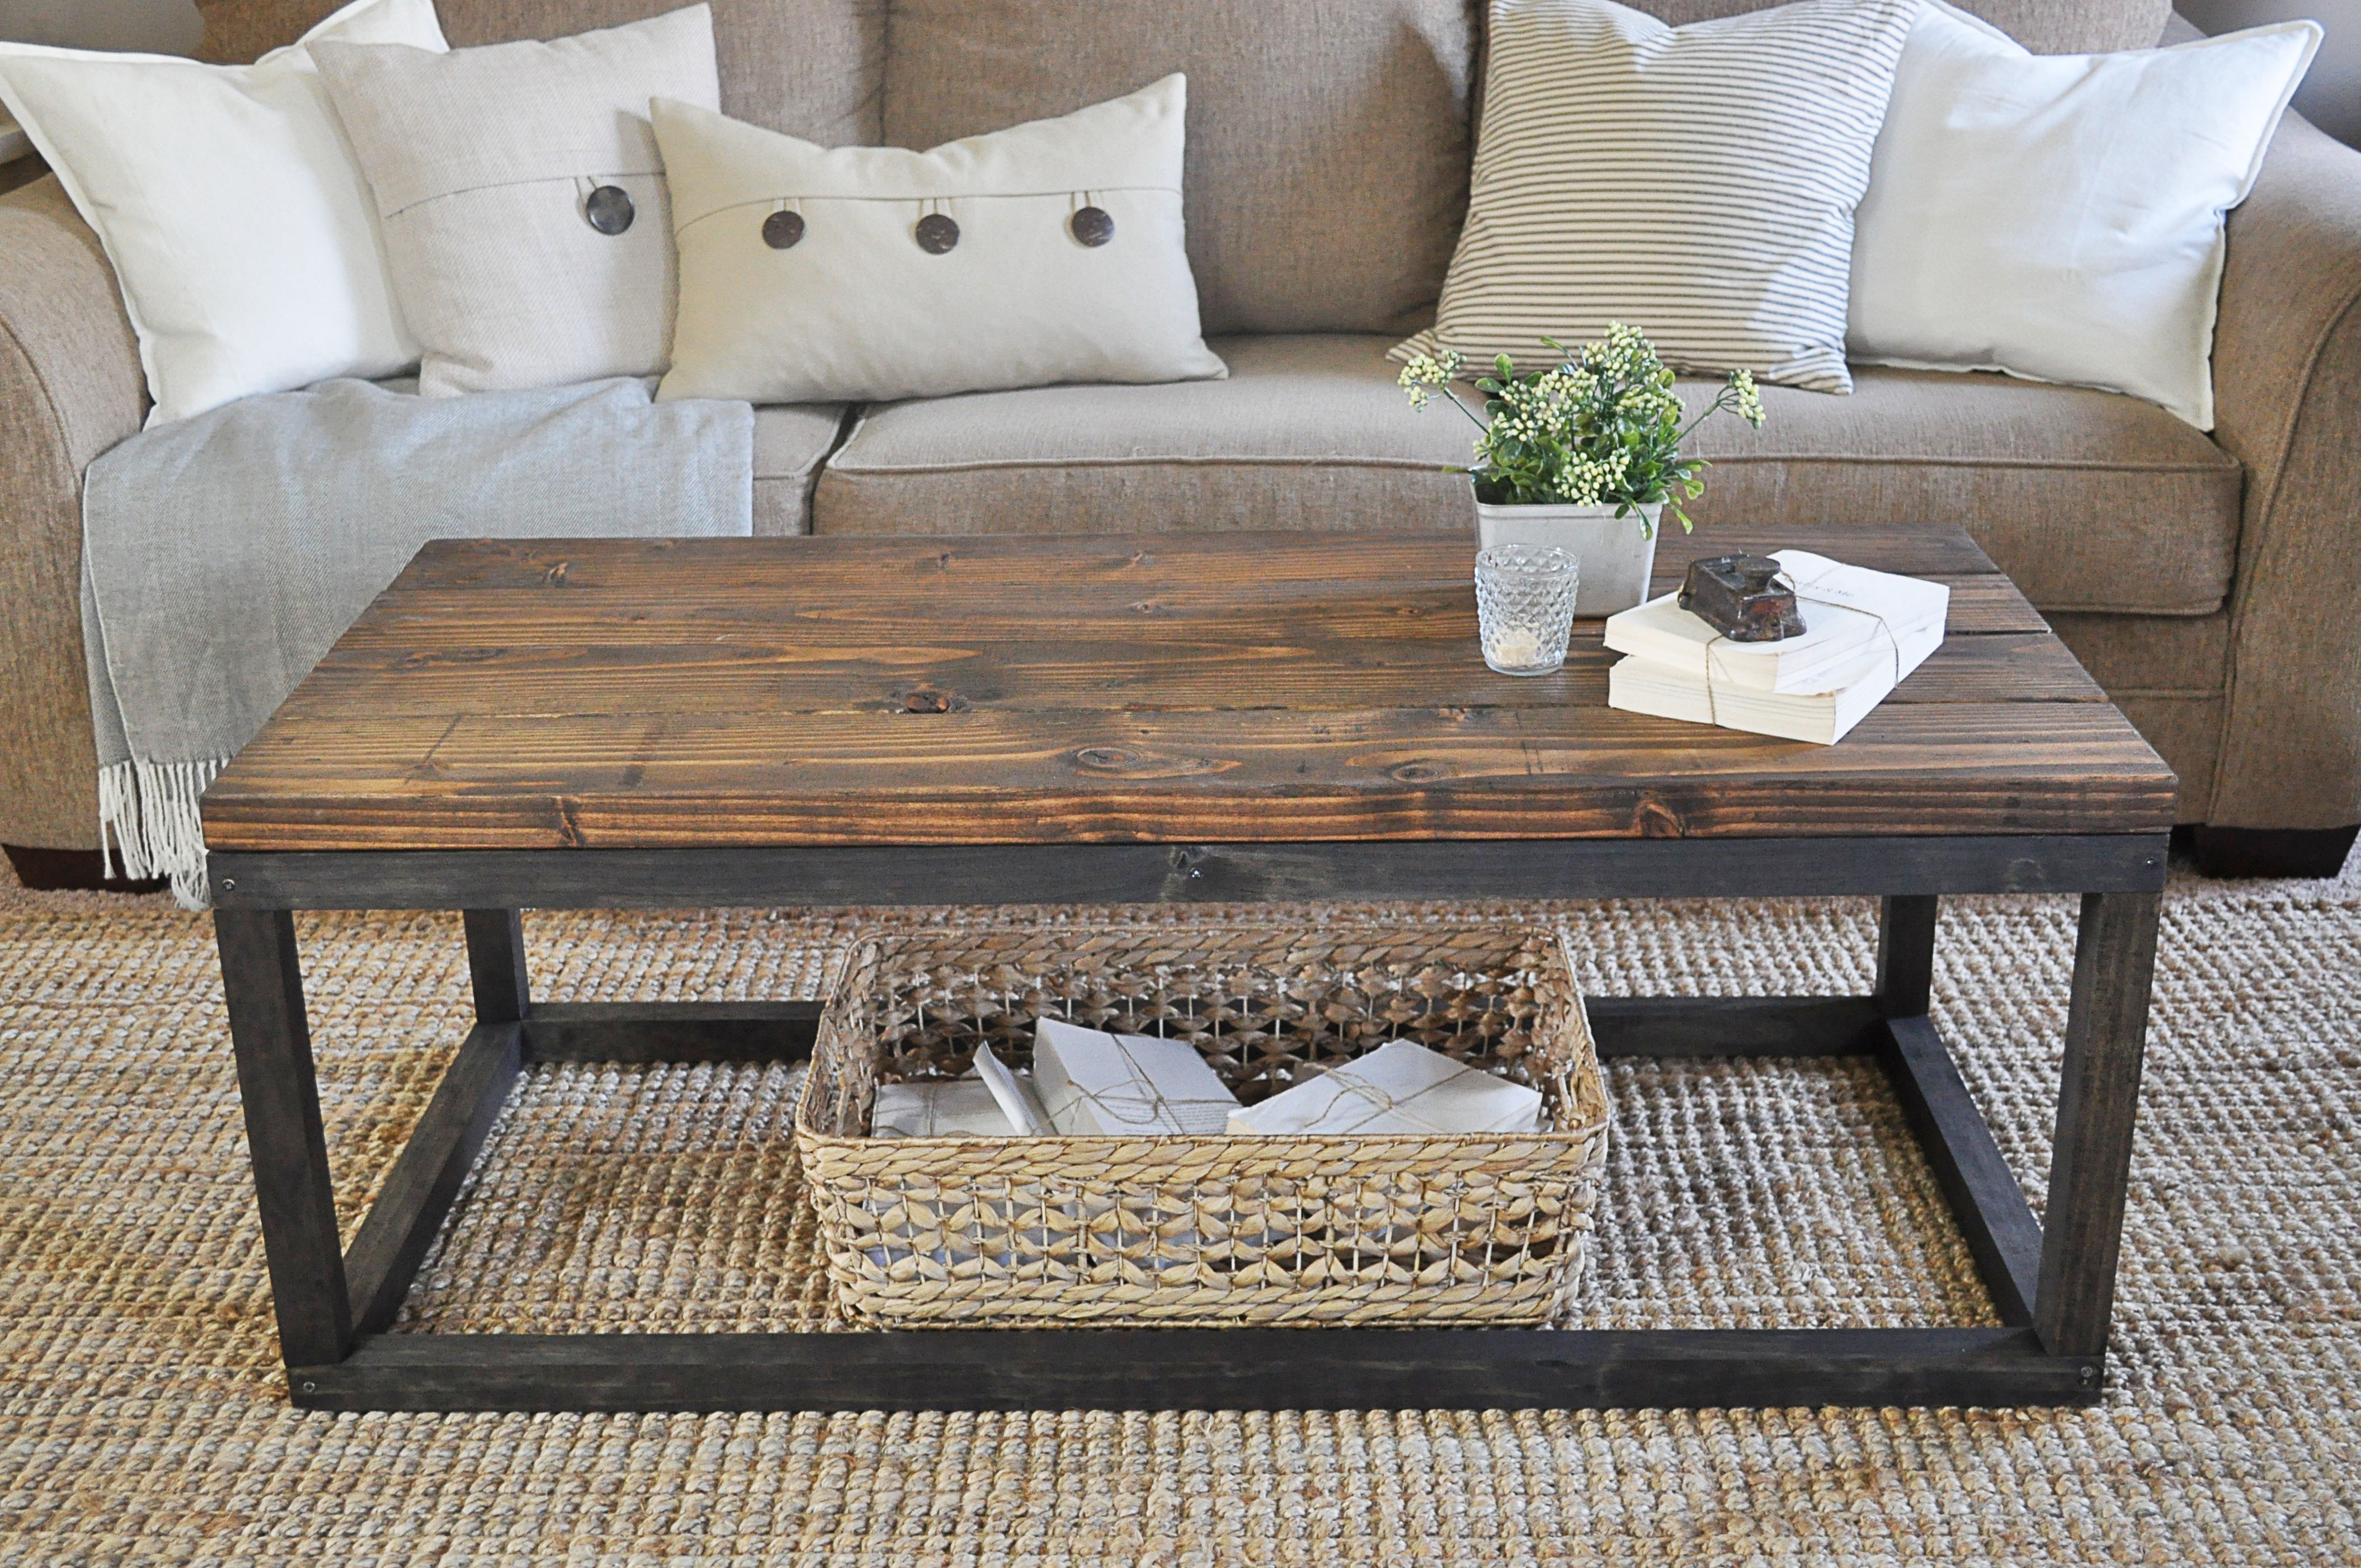
One of my favorite aspects of this DIY Industrial Coffee Table, is that you can customize it anyway you want. Use different stains or even paint it whatever color you need for the space you are decorating. Mess around with the measurements too if you need to.

Shop Similar Industrial Coffee Tables

Similar DIY Projects
- DIY Planked Wood Nightstands
- DIY Crate Side Tables
- Easy DIY Baby Gate
- Wooden Coffee Table Makeover
- Vintage Cedar Chest Makeover
Pin This Post for Later

I followed your instructions- oh my – this is a huge table, thanks for sharing
Thanks for the plans! Made this almost all according to the plan. I added in a shelf on the bottom with 2×6’s (makes it really heavy). Also, I had to brace all sides as it was quite wobbly and we have a 2 year old, so had to sturdy it up. Added in 16 2″ black metal “L” brackets and that made it quite sturdy!
Thanks again for the plans and the measurements! Worked like a charm!
Hi! I just built this and am having the same problem. Would you mind adding a photo or emailing one to me with the L-brackets so I can see how to go about adding them?
I’m so glad they worked for you! And love that you added a bottom, looking back I wish I would have done that too! And thanks for adding how you sturdied it up. I have gotten comments about it being wobbly for some, so I hope that helps others! Our has held up pretty good over the years. Always appreciate the feedback!
Hello Ashley,
Great Information!!!
Firstly, thanks for your Article. I have read this blog. The content is very easy and friendly. I will follow the author for the next tips. Have a good day!! Thanks
-Kieran
I LOVE this entire look. I’ve been looking for an industrial coffee table that is rather simple looking Going to try. Your sofa is gorgeous. Can you tell me more about it. Where did you get it….material? Thank you!
I want to make this for my family room. Was wondering how do I get a copy of the plans.
Can’t find Douglas for in my location. Any good substitutes?
What the heck… this is amazing!!! You definitely can’t tell it’s a DIY project. I think you could definitely make and sell these to people if you really wanted to… just saying 🙂
Hi! I love this coffee table and have intentions of trying it myself! What type of polyurethane did you use? I recently made an end table similar to this but the polyurethane I used gave it a glossier coat and I prefer the more matte finish on yours. 🙂
Thanks!
You say you are putting angled pieces in do you have a picture of the finished product?
Made the table with my son as a school project. He had to build something so I choose this. It looks so good. We love it! ????
Definitely making this for my man for Christmas. We don’t have a coffee table yet and your plans are so great I can’t wait to try this! Thank you for sharing.
My husband and I tried this and believe me it was so great to make it… thanks for sharing enjoyed a great time
We built this per your plans today, but we will have to rebuild tomorrow as the design is not structurally sound. The frames at top and bottom should be acting as cross-bracing for the legs (set between them) rather than just putting the legs into the top and bottom. The look is nice, but not nearly sturdy enough to actually use.
So sorry to hear that! Ours has worked out well, no complains! You can always tweak it to your standards and specifications of course, sad that you have to rebuild but hope it works out! 🙂 Appreciate the feedback!
Thanks so much for these instructions! I made this table this week and I absolutely LOVE it!! It was my first project building something so I was happy to find something that was easy but looked awesome 🙂
Yay! I’m so happy to hear that! Glad it worked out for you.
Hi,
Would you mind if I use your design to make money? I would be willing to share the profits.
How do you get 5 20″ parts on an 8 foot board. That’s 100 inches not accounting for the cut lines out of 96 inches of wood.
I used 4 8ft 2×2 boards that measure approximately 384in all together. This is where you get the 5 20″ parts in addition to the 48in parts with extra board to spare. Hope this helps!
Hey, I know this is an older post but i was wondering if you think the table would still work if I cut the dimensions in half and used them as end tables instead of a coffee table?
I don’t see why it wouldn’t! And you can always tweak it as your build if you find it isn’t sturdy enough or if its not the size you want. Cutting it in half might be too long, but again, its whatever works for your space!
Did you ever make those end tables? I’m working on the coffee table now and would love the plans to the matching end tables! Such a great table and looks awesome in your living room! Can’t wait to see it in mine!!!! 🙂
Hi, I was wondering which finish you used of polyurethane? Satin, semi-glossy, etc.? Thanks so much!
I usually always use a clear matte, I don’t like it to be too glossy on the stained wood.
How sturdy is this? I feel like with any horizontal force it would crumble as there are no braces. Looks awesome, just wondering.
Thanks! I think its rather sturdy! You could always add some more support if you don’t think so, but we haven’t had any issues so far 🙂
I love your table and your sofa. Do mind me asked where you purchased this sofa?
Thank you! I bought the sofa many many years ago from Ashley Furniture 🙂
In love with this table! Great job! I’m in the same boat with budget 🙂 can you tell me where you found the select pine for the base? I tried Home Depot but didn’t have any luck for some reason.
Thanks!
Marcy
Hi Marcy! We found the select pine at Home Depot, strange yours didn’t have them! It was actually the only hardware store around our area that had them, I know Lowes didn’t. Maybe try a different location near you, if that is an option? Hope this helps!
Thanks Ashley! I ended up finding some at lowes! Apparently that kind wasn’t available at Home Depot for at least 100 miles! So weird!
Love this table! Directions were great. My hubby and dad made it for me. It seemed a bit wabbly for us so we added an angled pieces on the end. We have kids so I wanted make it really sturdy. Thanks for the wonderful directions.
Yay! I’m so glad it worked for you! Ours is a tiny bit wobbly too, adding the angled pieces is a great idea if you have kids or pets that might bump up against it! Thanks so much for sharing! 🙂
Do you have pictures of what it wound up looking like with the additional braces?
Thank you for the inspiration and the great tutorial. I made one just like it! http://redesignbylarras.blogspot.com/2016/12/industrial-coffee-table.html
So beautiful room, table, colors!… Please can tell me what color is your wall?
This particular color is Tony Taupe by Sherwin Williams!
I am really confused by the math and wonder what am I missing? 4 2×6 boards would actually make the table top 22 inches wide (since a 2×6 is really 1.5 x 5.5). If the 2×2’s underneath are actually 1.5 x 1.5, wouldn’t the width of 20 inches plus 1.5 plus 1.5 bring the total 2×2 width to 23 inches? How does the top not look narrower than the frame?
That’s a good question. Did you ever get a reply?
Sorry for the delay in answering! I should have disclaimered that all wood is not cut exact, but to make up for the difference in the table top, we just spaced out the 2×6’s with a small gap in between each one so it would match up with the frame. Make sense? Hope this helps! 🙂
How do you get 5 20″ parts on an 8 foot board. That’s 100 inches not accounting for the cut lines out of 96 inches of wood.
This is so cool looking! Great job! Would you consider sharing at our link party! I really think our readers would love this!
http://www.thestonybrookhouse.com/2016/04/dishing-it-digging-it-link-party-93.html
This looks so good. At first glance I definitely thought the bottom was metal!
Oh good! I’m so glad you like it!
This turned out sooooooo good!
Awe thanks Katie!!! I appreciate that! 🙂
I absolutely LOVE this!! It fits so perfectly in your room! Thank you so much for the great directions, I may have to do this one 🙂
Thank you so much for the kind comments! I hope you do try it! Xo!